Getting Started Overview
🚀 Welcome to AlertD Setup
This guide will walk you through deploying AlertD in your AWS environment and connecting your infrastructure. The entire process takes about 25-35 minutes and consists of two main phases.
📋 What You’ll Need Before Starting
Before beginning the deployment, make sure you have:
AWS Requirements
-
AWS Account with appropriate permissions
- CloudFormation stack creation and management
- IAM role creation and policy attachment
- ECS, VPC, ALB, Secrets Manager, and CloudWatch access
- Ability to create service-linked roles for ECS/ELB
Do not use the AWS account root user to deploy or operate AlertD. Create an IAM user, or assume an IAM role, that has only the permissions listed above. The root user should be reserved for account-level tasks only. See AWS best practices for the root user .
-
Supported AWS Region
- AlertD supports the following regions:
Region Group Region Codes US us-east-1, us-east-2, us-west-1, us-west-2 Europe eu-central-1, eu-north-1, eu-south-1, eu-south-2, eu-west-1, eu-west-3, il-central-1, me-central-1 Asia-Pacific ap-northeast-1, ap-northeast-2, ap-northeast-3, ap-south-1, ap-south-2, ap-southeast-1, ap-southeast-2, ap-southeast-3, ap-southeast-4, ap-southeast-5, ap-southeast-7 -
DNS Domain & SSL Certificate
- A domain name you control (e.g.,
alertd.example.com) - An ACM SSL/TLS certificate in the same region where you’ll deploy
- Request a public certificate in ACM or import an existing certificate
- If you just want to try AlertD and don’t have a way to create a public certificate, you can use a self-signed certificate instead. Self-signed certificates should not be used for production deployments.
- A domain name you control (e.g.,
-
LLM Provider Choice
- Amazon Bedrock (Claude) - Fully managed through AWS, no external API calls
- OpenAI - Requires OpenAI API key
- Anthropic - Requires Anthropic API key (direct, not via Bedrock)
Authentication Provider
- Google Account or GitHub Account for team authentication
- You’ll use this to set up your AlertD workspace and authorize team members
Network Access
Your deployment and end-user browsers must be able to reach:
- auth.demo.alertd.ai over TCP 443
- api.openai.com over TCP 443 (if using OpenAI as LLM provider)
Prerequisite Skills
Deploying AlertD does not require writing code, but the person performing the deployment should be comfortable with the following:
- AWS Management Console — navigating to CloudFormation, IAM, ACM, and EC2/VPC views.
- AWS CloudFormation — launching a stack from a template URL, providing parameter values, acknowledging IAM capabilities, and reading the Events and Outputs tabs.
- AWS IAM — understanding the difference between users, roles, and managed policies; copying an ARN; (for Advanced Setup) pasting a trust policy and attaching a managed policy.
- AWS Certificate Manager (ACM) — requesting or importing a certificate and locating its ARN.
- DNS basics — creating a CNAME record at your DNS provider to point a custom domain at an ALB hostname.
- VPC networking basics (only if using an existing VPC) — identifying public vs. private subnets and confirming NAT Gateway egress.
- AWS CLI (optional) — useful for the operational procedures in Monitoring and Maintaining AlertD, but not required for initial deployment.
No programming, scripting, or container expertise is required.
🗺️ Setup Roadmap
Phase 1: Deploy AlertD Infrastructure
In this phase, you’ll:
- Subscribe to AlertD on AWS Marketplace
- Deploy the AlertD CloudFormation stack to your AWS account
- Configure networking (new or existing VPC)
- Set up load balancer and ECS Fargate services
- Configure your chosen LLM provider
Time: ~15-20 minutes
Phase 2: Choose Your Setup Path
After deployment, the setup steps depend on how you plan to use AlertD:
-
Simple Setup — If you are deploying AlertD in the same AWS account that AlertD will monitor, use the simple setup. During deployment, the CloudFormation template automatically creates the IAM monitoring role for you (via the
CreateMonitoringRoleparameter, which defaults totrue). You only need to authenticate and you’re ready to go. -
Advanced Setup — If you want AlertD to monitor a different AWS account than the one it is deployed in, you need to proceed through the advanced setup. This involves manually creating an IAM role in the target account with the correct trust policy and read-only permissions, then providing that role ARN to AlertD.
Simple Setup (Same Account)
Once deployed, you’ll:
- Access the AlertD application URL from CloudFormation outputs
- Connect your Google or GitHub account for authentication
- The monitoring role is already configured — no manual IAM steps needed
Time: ~5-10 minutes
Advanced Setup (Cross-Account)
Once deployed, you’ll:
- Access the AlertD application URL from CloudFormation outputs
- Connect your Google or GitHub account for authentication
- Create an IAM role with read-only access in the target AWS account
- Configure AlertD with the role ARN to access your infrastructure
Time: ~10-15 minutes
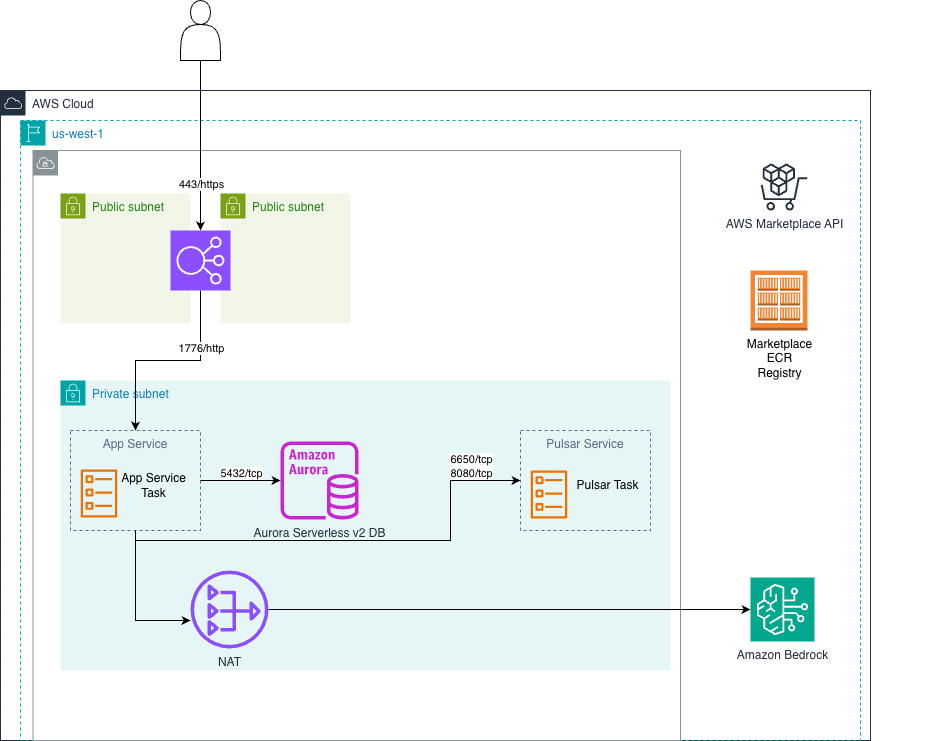
🏗️ Architecture Overview
AlertD deploys as a fully containerized web application on AWS ECS Fargate. You have two deployment options:
Public Load Balancer Deployment
Standard deployment with a public Application Load Balancer for end-user access via HTTPS.
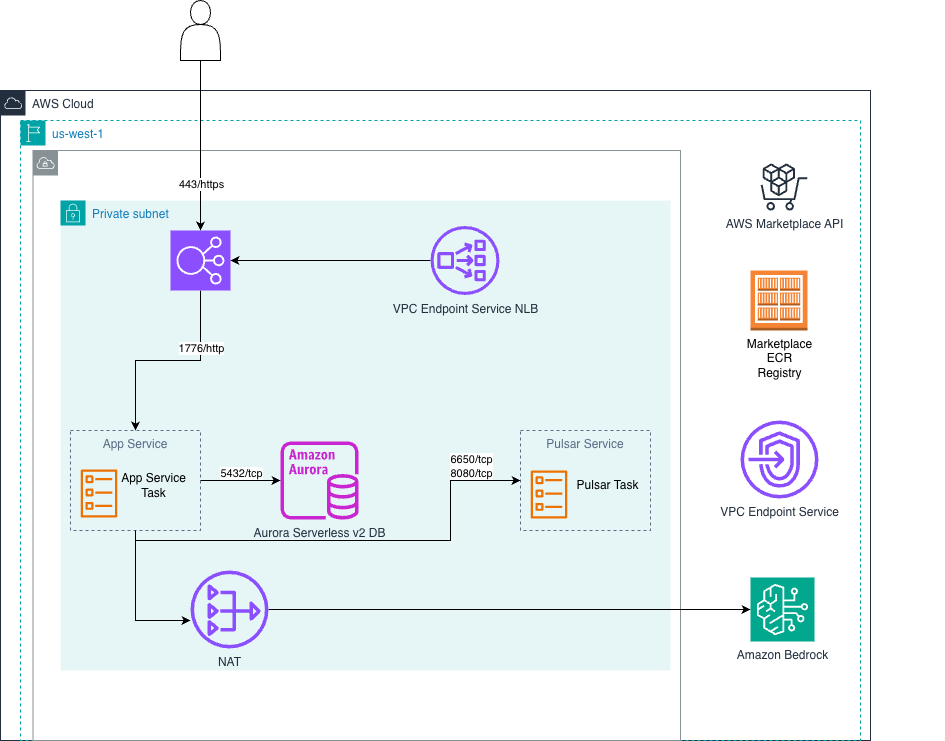
Private Load Balancer Deployment
Fully private deployment using a private ALB, suitable for organizations requiring all traffic to remain within their VPC.
🔒 Security Model
AlertD is designed with security as a top priority:
- Read-Only Access: AlertD only requests CloudWatch read permissions
- Ephemeral Credentials: Uses AWS STS tokens, not permanent access keys
- No Write Permissions: Cannot modify, change, or write to any AWS infrastructure
- Immediately Revocable: Remove the IAM role at any time to revoke access
- Encrypted Transit: All data transmission uses 256-bit encryption
- No Customer-Managed Keys Required: AlertD does not ask you to create any KMS keys or other cryptographic material. Encryption at rest is handled by AWS-managed defaults for Aurora, Secrets Manager, and EBS.
- Fargate Compute, No IMDS Exposure: The AlertD application runs on AWS ECS Fargate, which does not expose the EC2 Instance Metadata Service (IMDS). IMDSv1/IMDSv2 considerations therefore do not apply to AlertD’s compute layer.
- Standard AWS SDK Credential Chain: All calls to AWS APIs are made through the AWS SDK v3 for JavaScript, which follows the standard AWS SDK credential provider chain . On Fargate, the SDK resolves credentials from the ECS Task Role; for cross-account monitoring it then performs
sts:AssumeRoleagainst the customer role. No long-term IAM user access keys are used.
🆘 Design Partner Support
During the design partner phase, AlertD support may need temporary access to gather usage metrics. If deploying with a private load balancer, you can provide access via VPC endpoint service. This access will be disabled before production usage.
✅ Ready to Begin?
Once you have all prerequisites ready, proceed to the deployment guide. After deployment, follow the Simple Setup if monitoring the same account, or the Advanced Setup for cross-account monitoring.