Advanced Setup
This guide is for deployments where AlertD monitors a different AWS account than the one it is deployed in. You will authenticate your team, then manually create an IAM role in the target account with the correct trust policy and read-only permissions.
Estimated time: 10-15 minutes
If AlertD is monitoring the same account it is deployed in, you don’t need this guide. Use the Simple Setup instead — the IAM role is created automatically during deployment.
Overview
The advanced setup process consists of four phases:
Authentication Setup
Choose how your team signs in (Google, GitHub, Atlassian, or a local admin account) and create the superuser.
AWS Configuration
Review the trust policy and access model that AlertD uses.
Create IAM Role
Manually create an IAM role in the target AWS account with read-only permissions.
Complete Configuration
Provide the role ARN to AlertD and verify the connection.
Phase 1: Authentication Setup
Step 1: Access the AlertD Application
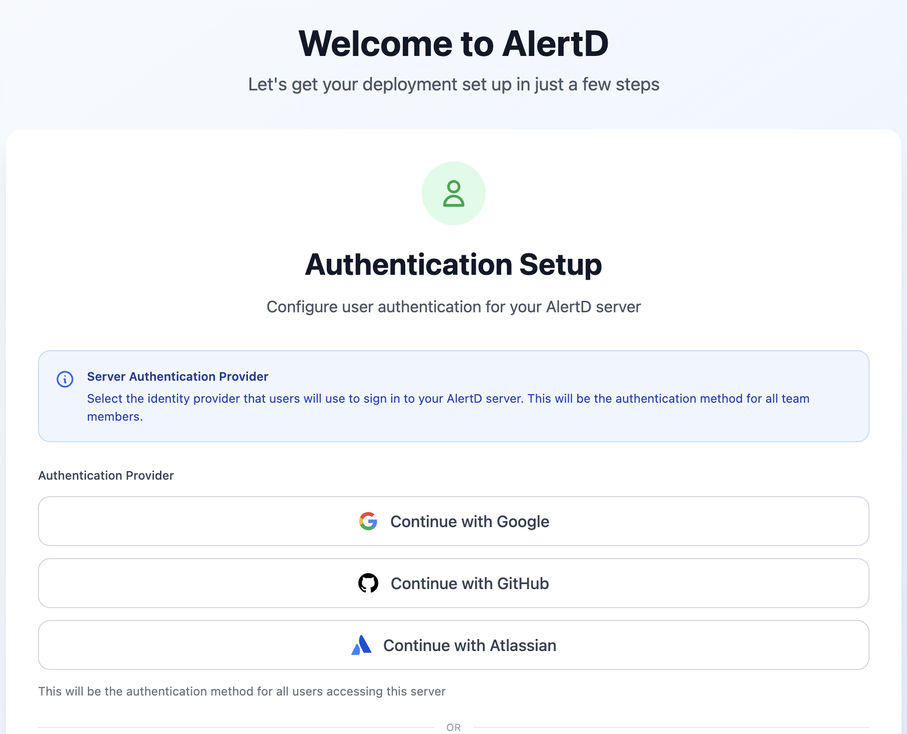
- Open the AlertDApplicationURL from your CloudFormation stack outputs
- Format:
https://d1234abcd.cloudfront.net - Or your custom domain if you configured one
- Format:
- You’ll see the Welcome to AlertD → Authentication Setup screen
Steps 2-4: Choose a Sign-In Method and Sign In
Authentication works the same way as in the Simple Setup. Choose Continue with Google, Continue with GitHub or Continue with Atlassian, or create a local superuser with Create the admin account, then complete sign-in. See Simple Setup → Phase 1 for the details of each option.
Security Note: When you use an identity provider, AlertD does not store your credentials. Authentication is handled entirely by the provider’s OAuth flow.
Phase 2: AWS Configuration
AlertD needs read-only access to your AWS resources to answer questions about your infrastructure. You’ll create an IAM role with the ReadOnlyAccess managed policy in the target AWS account.
Understanding the Access Model
AlertD uses:
- Ephemeral STS tokens (not permanent credentials)
- AWS ReadOnlyAccess managed policy (no write permissions)
- Cross-account AssumeRole pattern (AWS best practice)
- Immediately revocable access (remove IAM role anytime)
Step 5: Review AWS Configuration Requirements
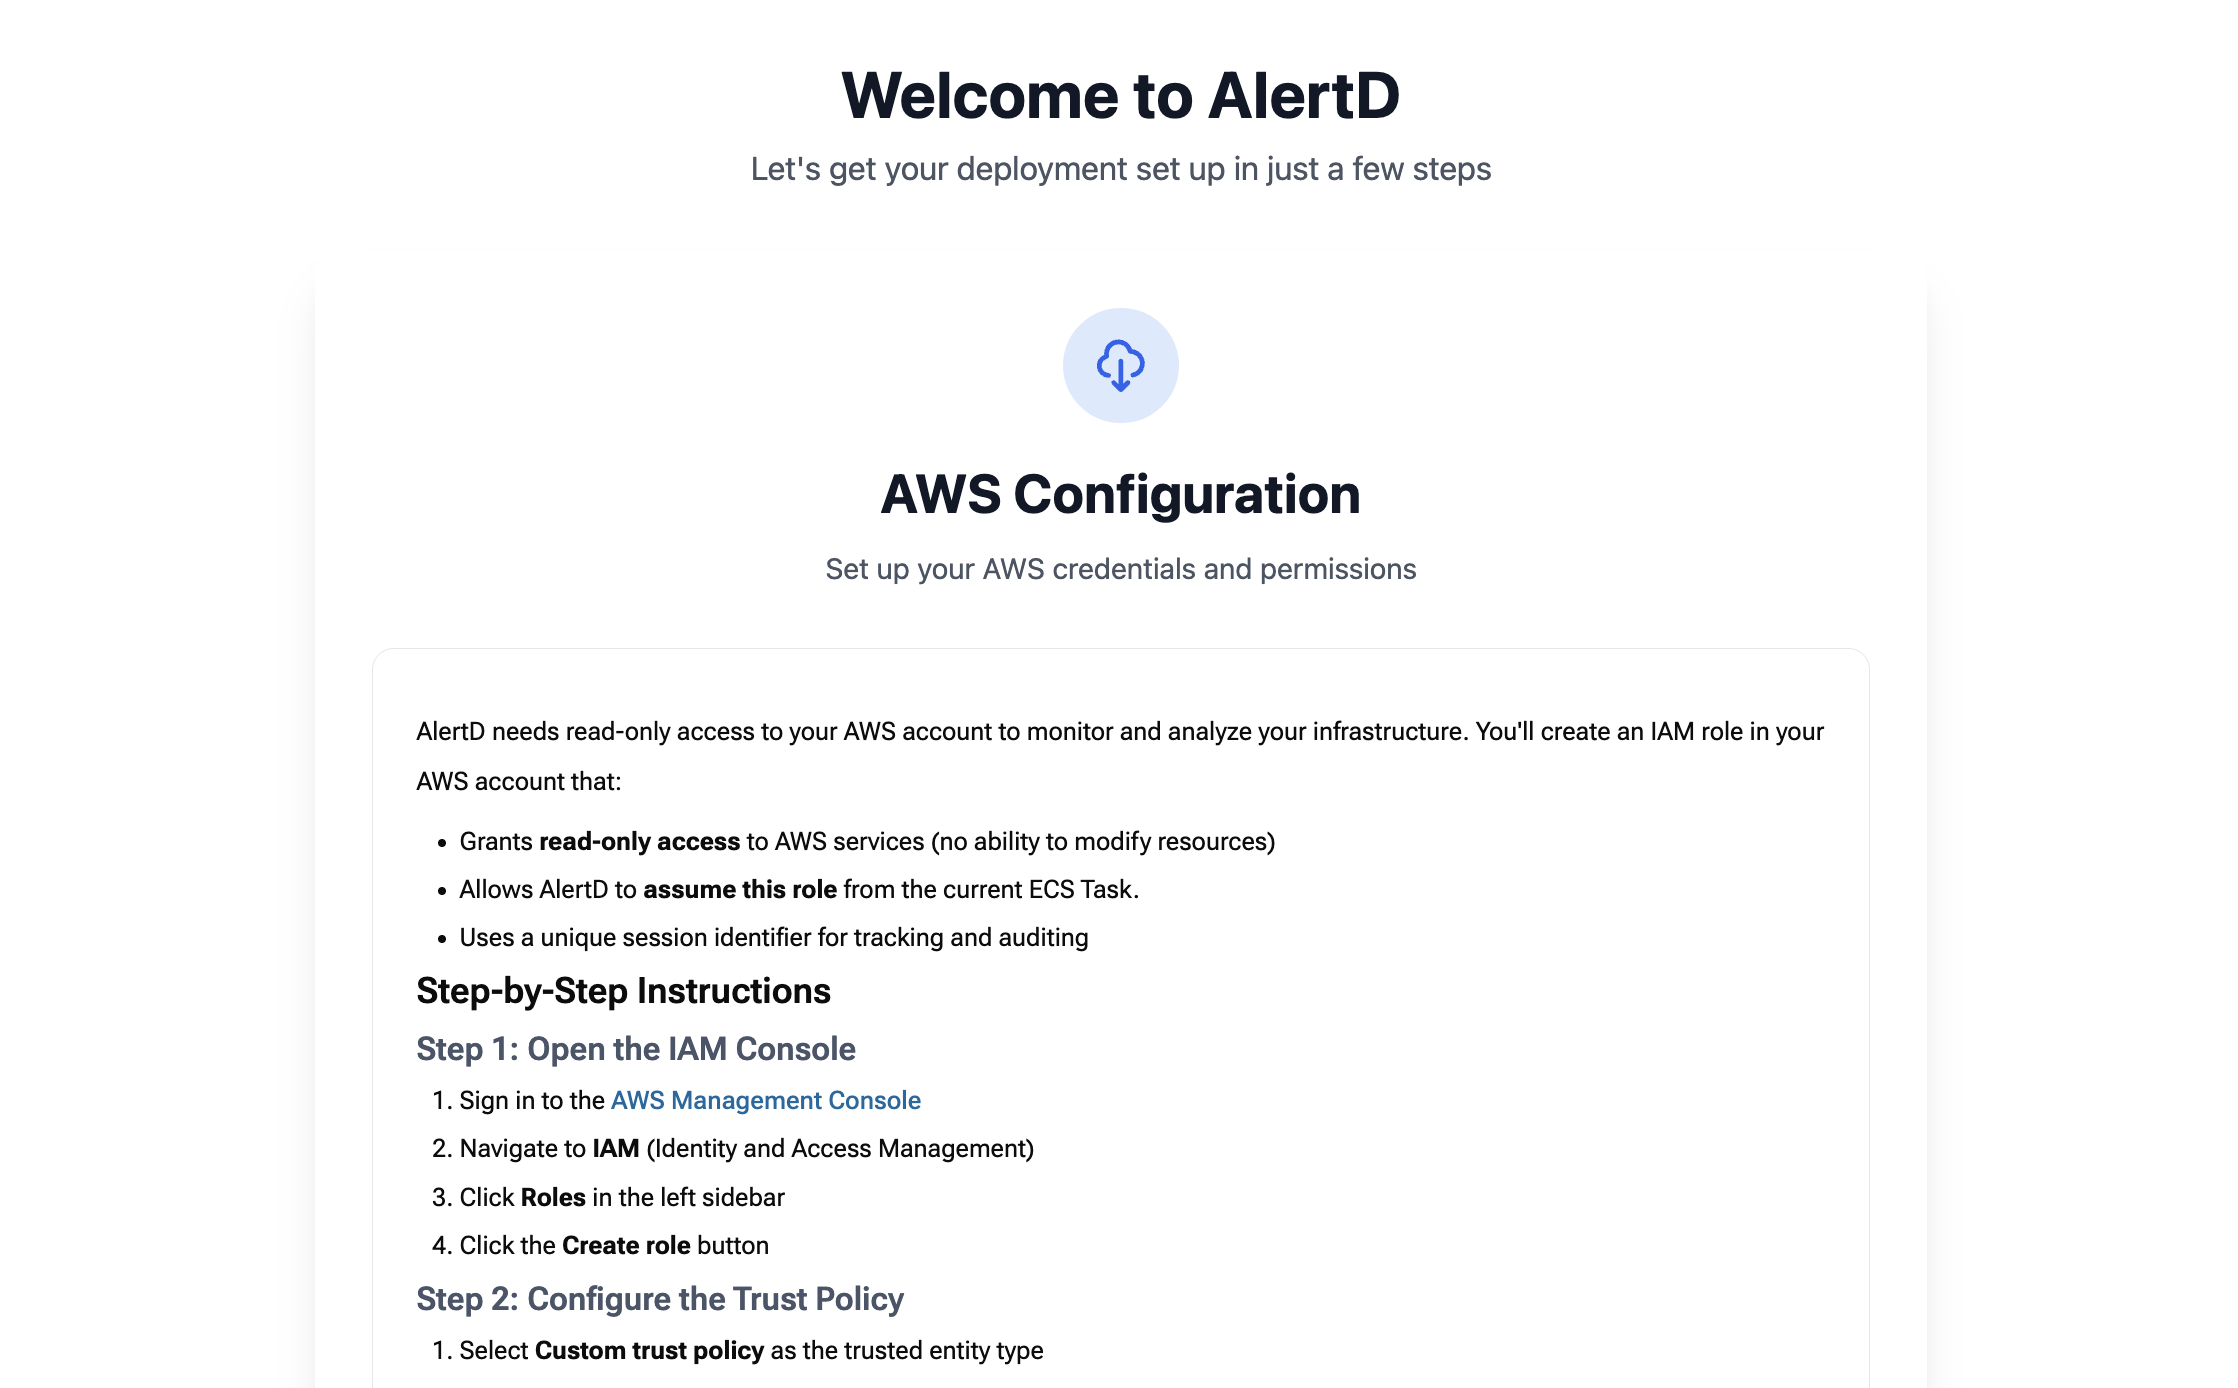
The AlertD setup wizard displays the AWS configuration section with instructions you will use to set up access to the target AWS account.
Step 6: Review Trust Policy
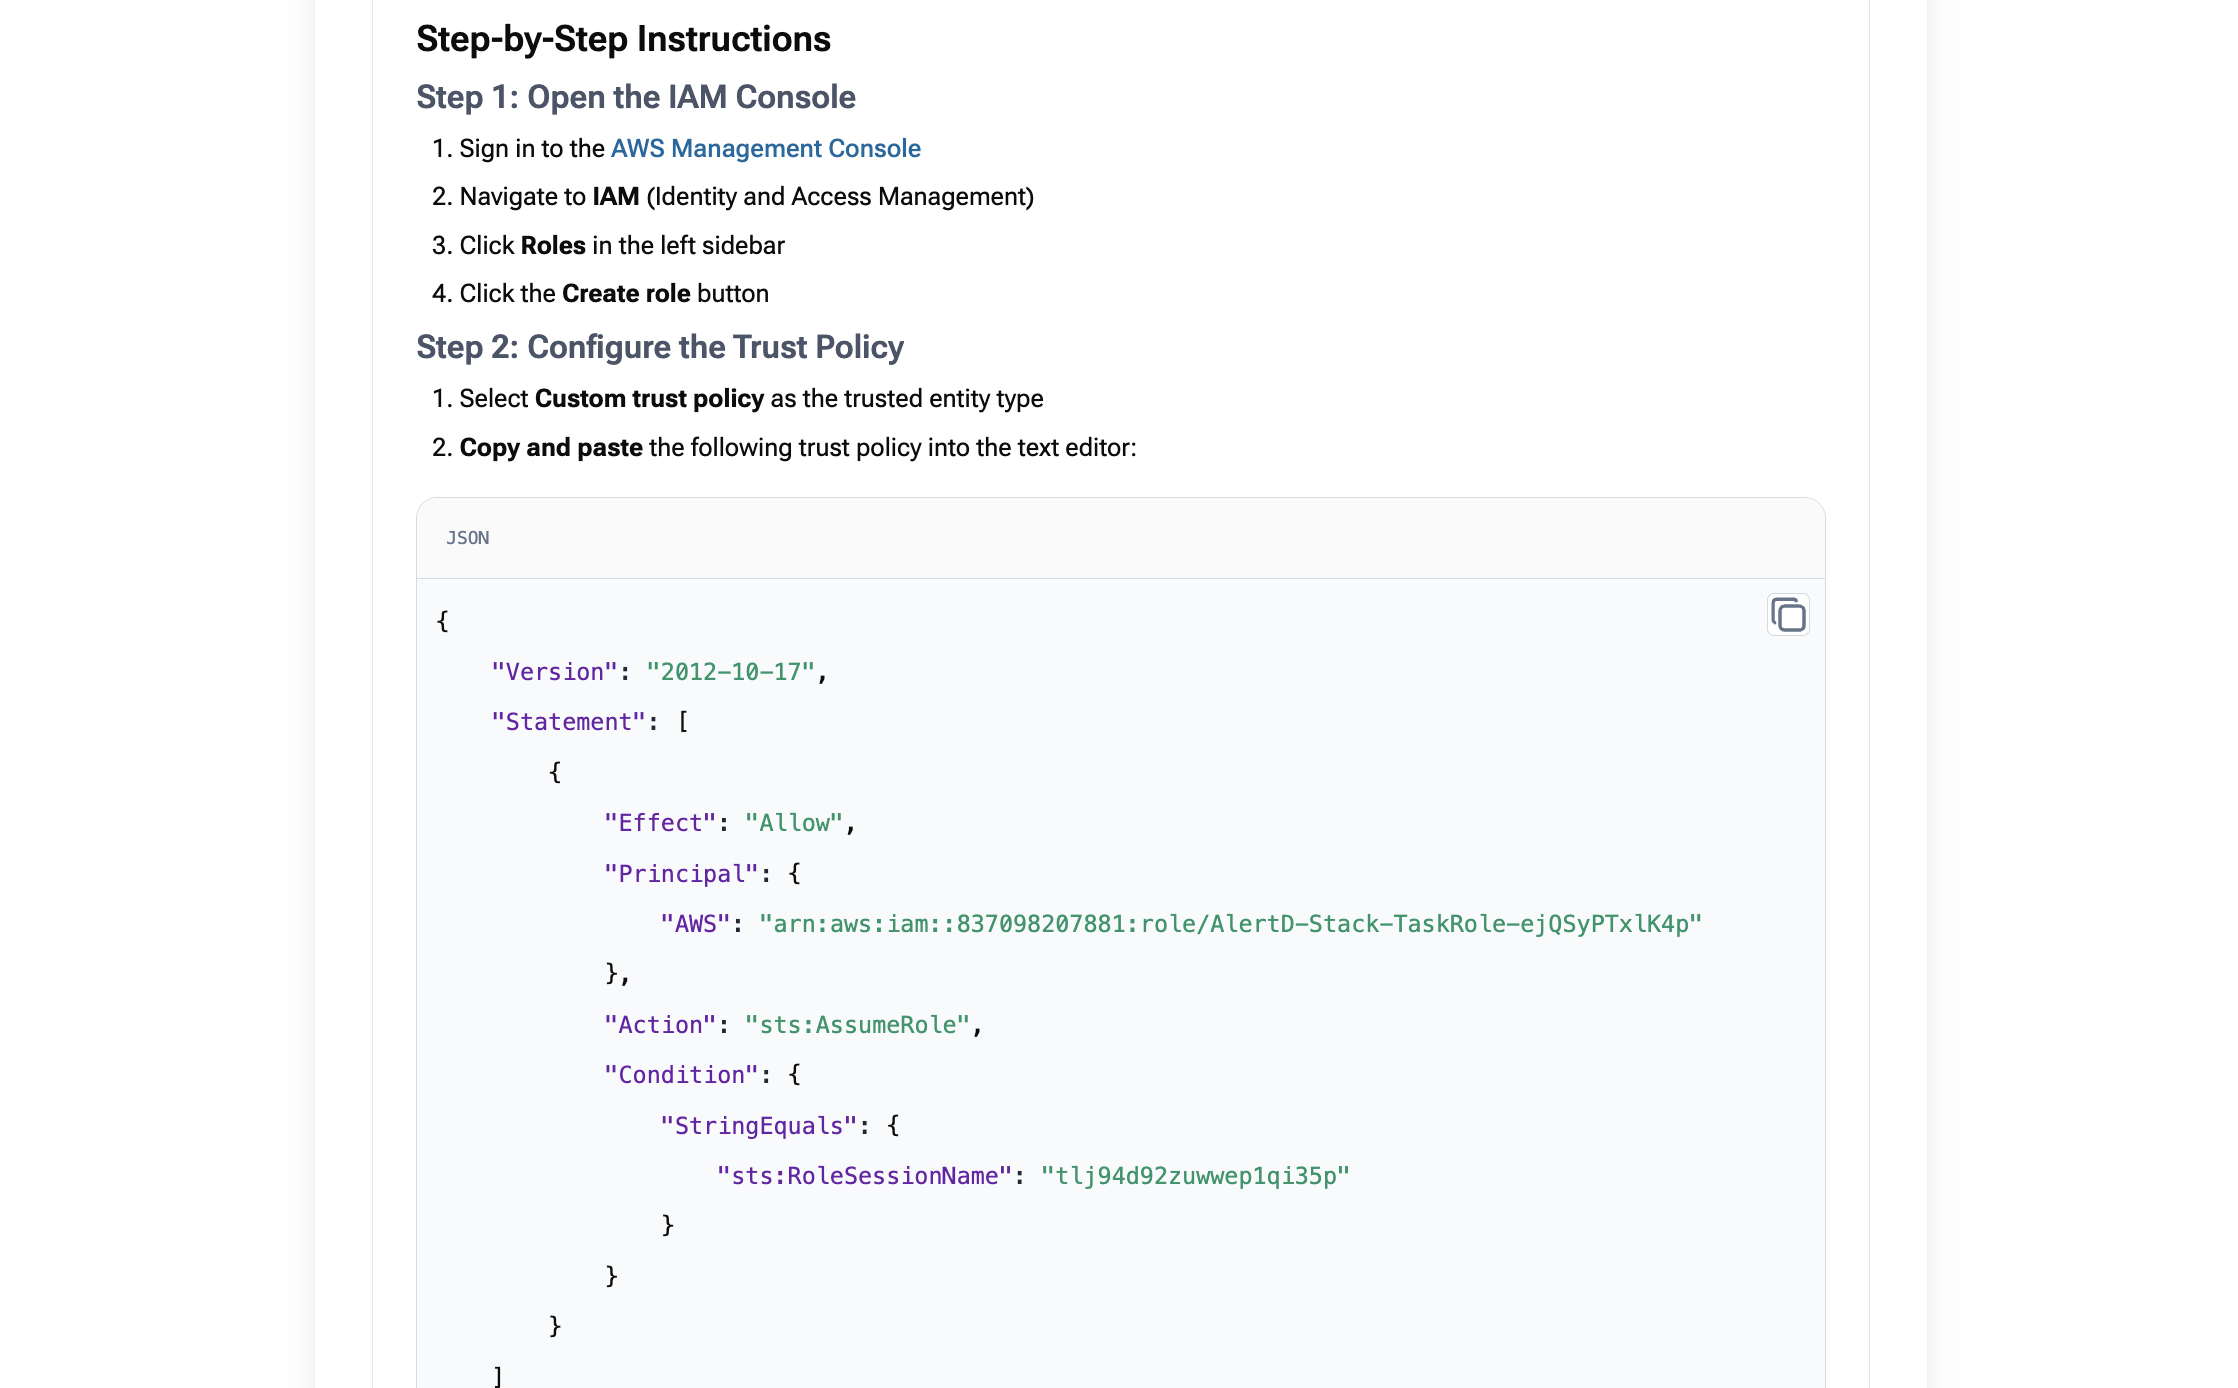
The trust policy displayed on screen shows:
{
  "Version": "2012-10-17",
  "Statement": [
    {
      "Effect": "Allow",
      "Principal": {
        "AWS": "arn:aws:iam::837098207881:role/AlertD-Stack-TaskRole-..."
      },
      "Action": "sts:AssumeRole",
      "Condition": {....}
    }
  ]
}
Key elements:
- Principal AWS ARN – The AlertD ECS task role (from your CloudFormation stack)
- Action –
sts:AssumeRole(allows AlertD to temporarily assume your role) - Effect –
Allow(grants permission) - Condition - Specifies a session name for role assumption.
You’ll copy this trust policy in the next steps.
Phase 3: Create the IAM Role
Step 7: Open AWS IAM Console
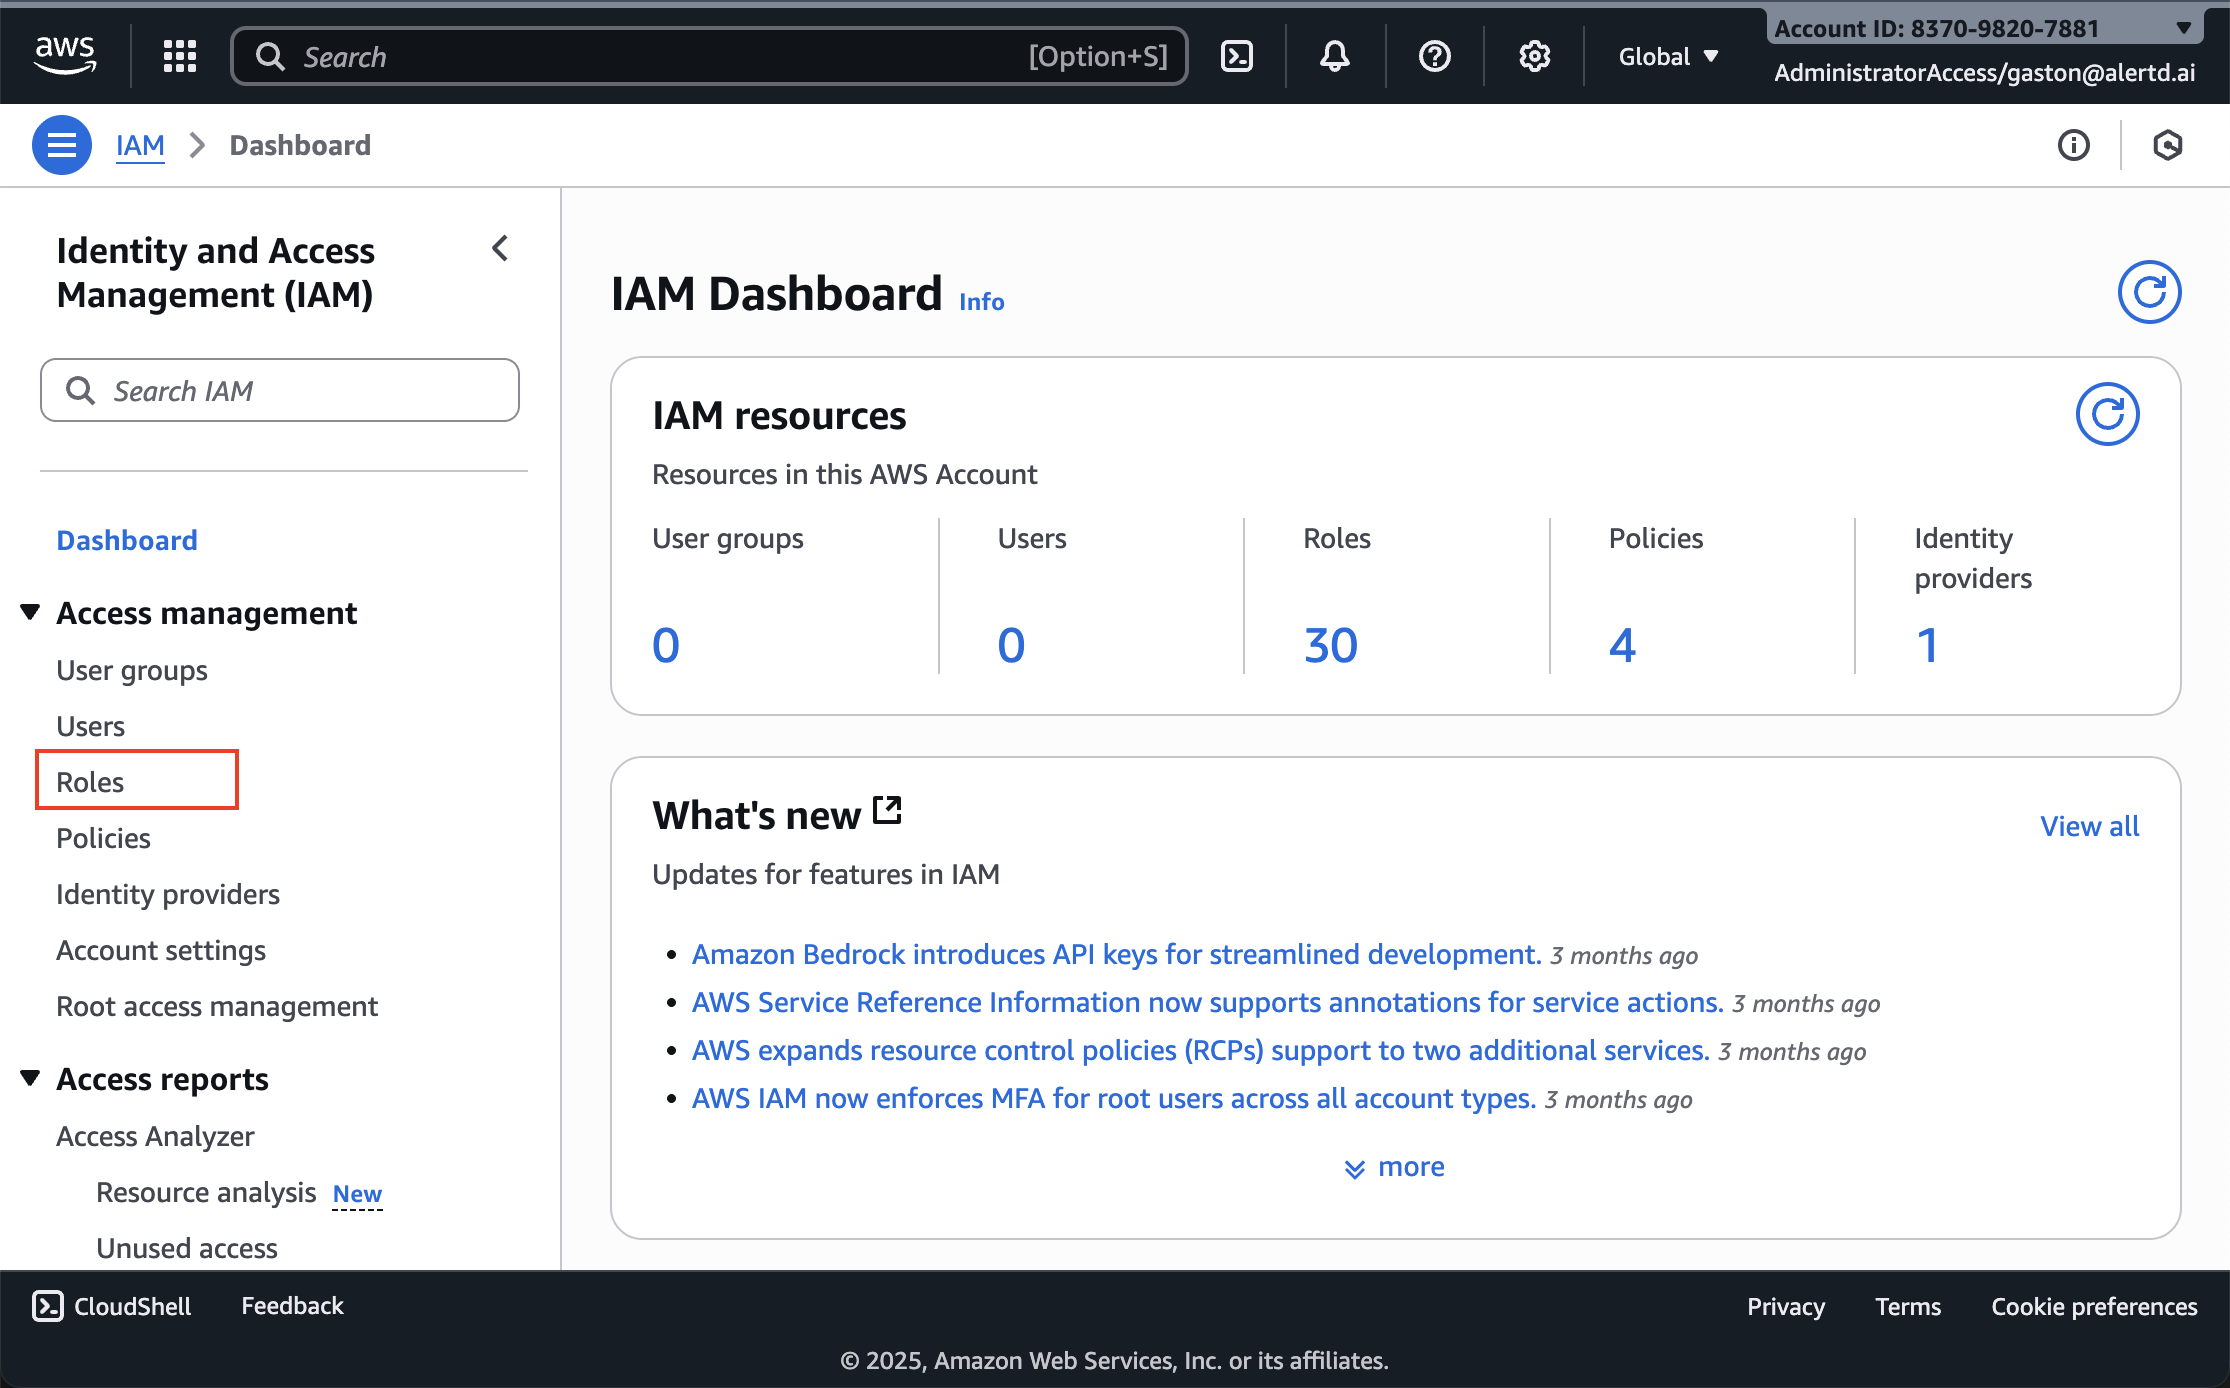
- Open a new browser tab
- Navigate to the AWS IAM Console: https://console.aws.amazon.com/iam/home
- Sign in to the target AWS account — the account you want AlertD to monitor (not the account where AlertD is deployed)
- The IAM Dashboard displays your current roles, policies, and users
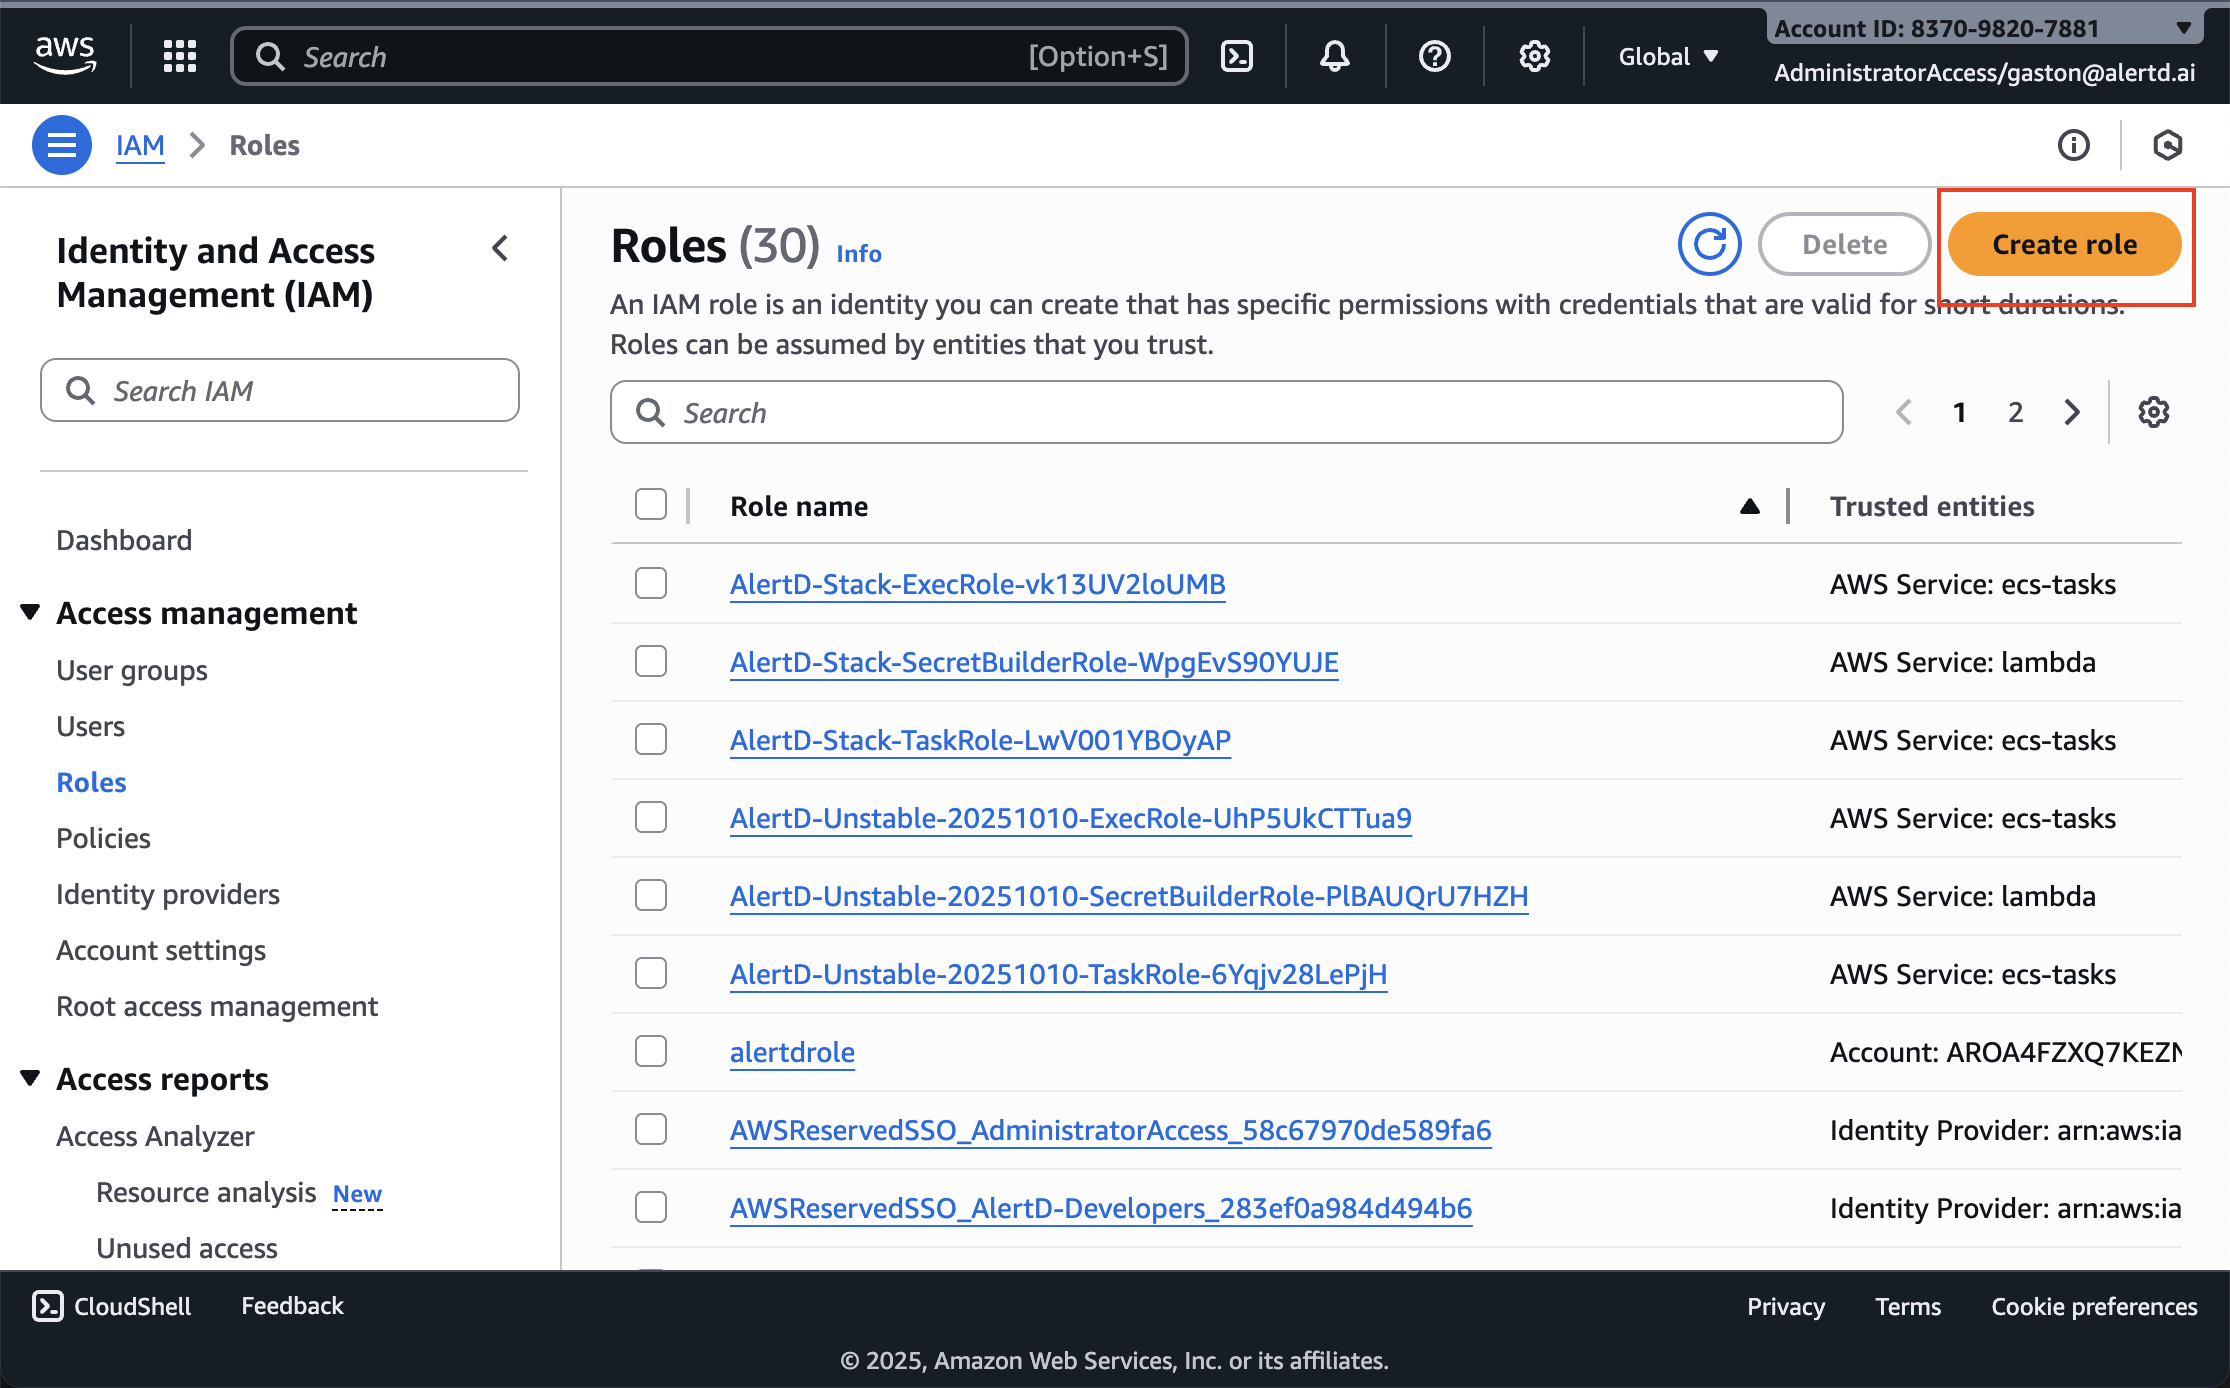
- In the left sidebar, click Roles
- Click the Create role button in the top right
Step 8: Select Custom Trust Policy
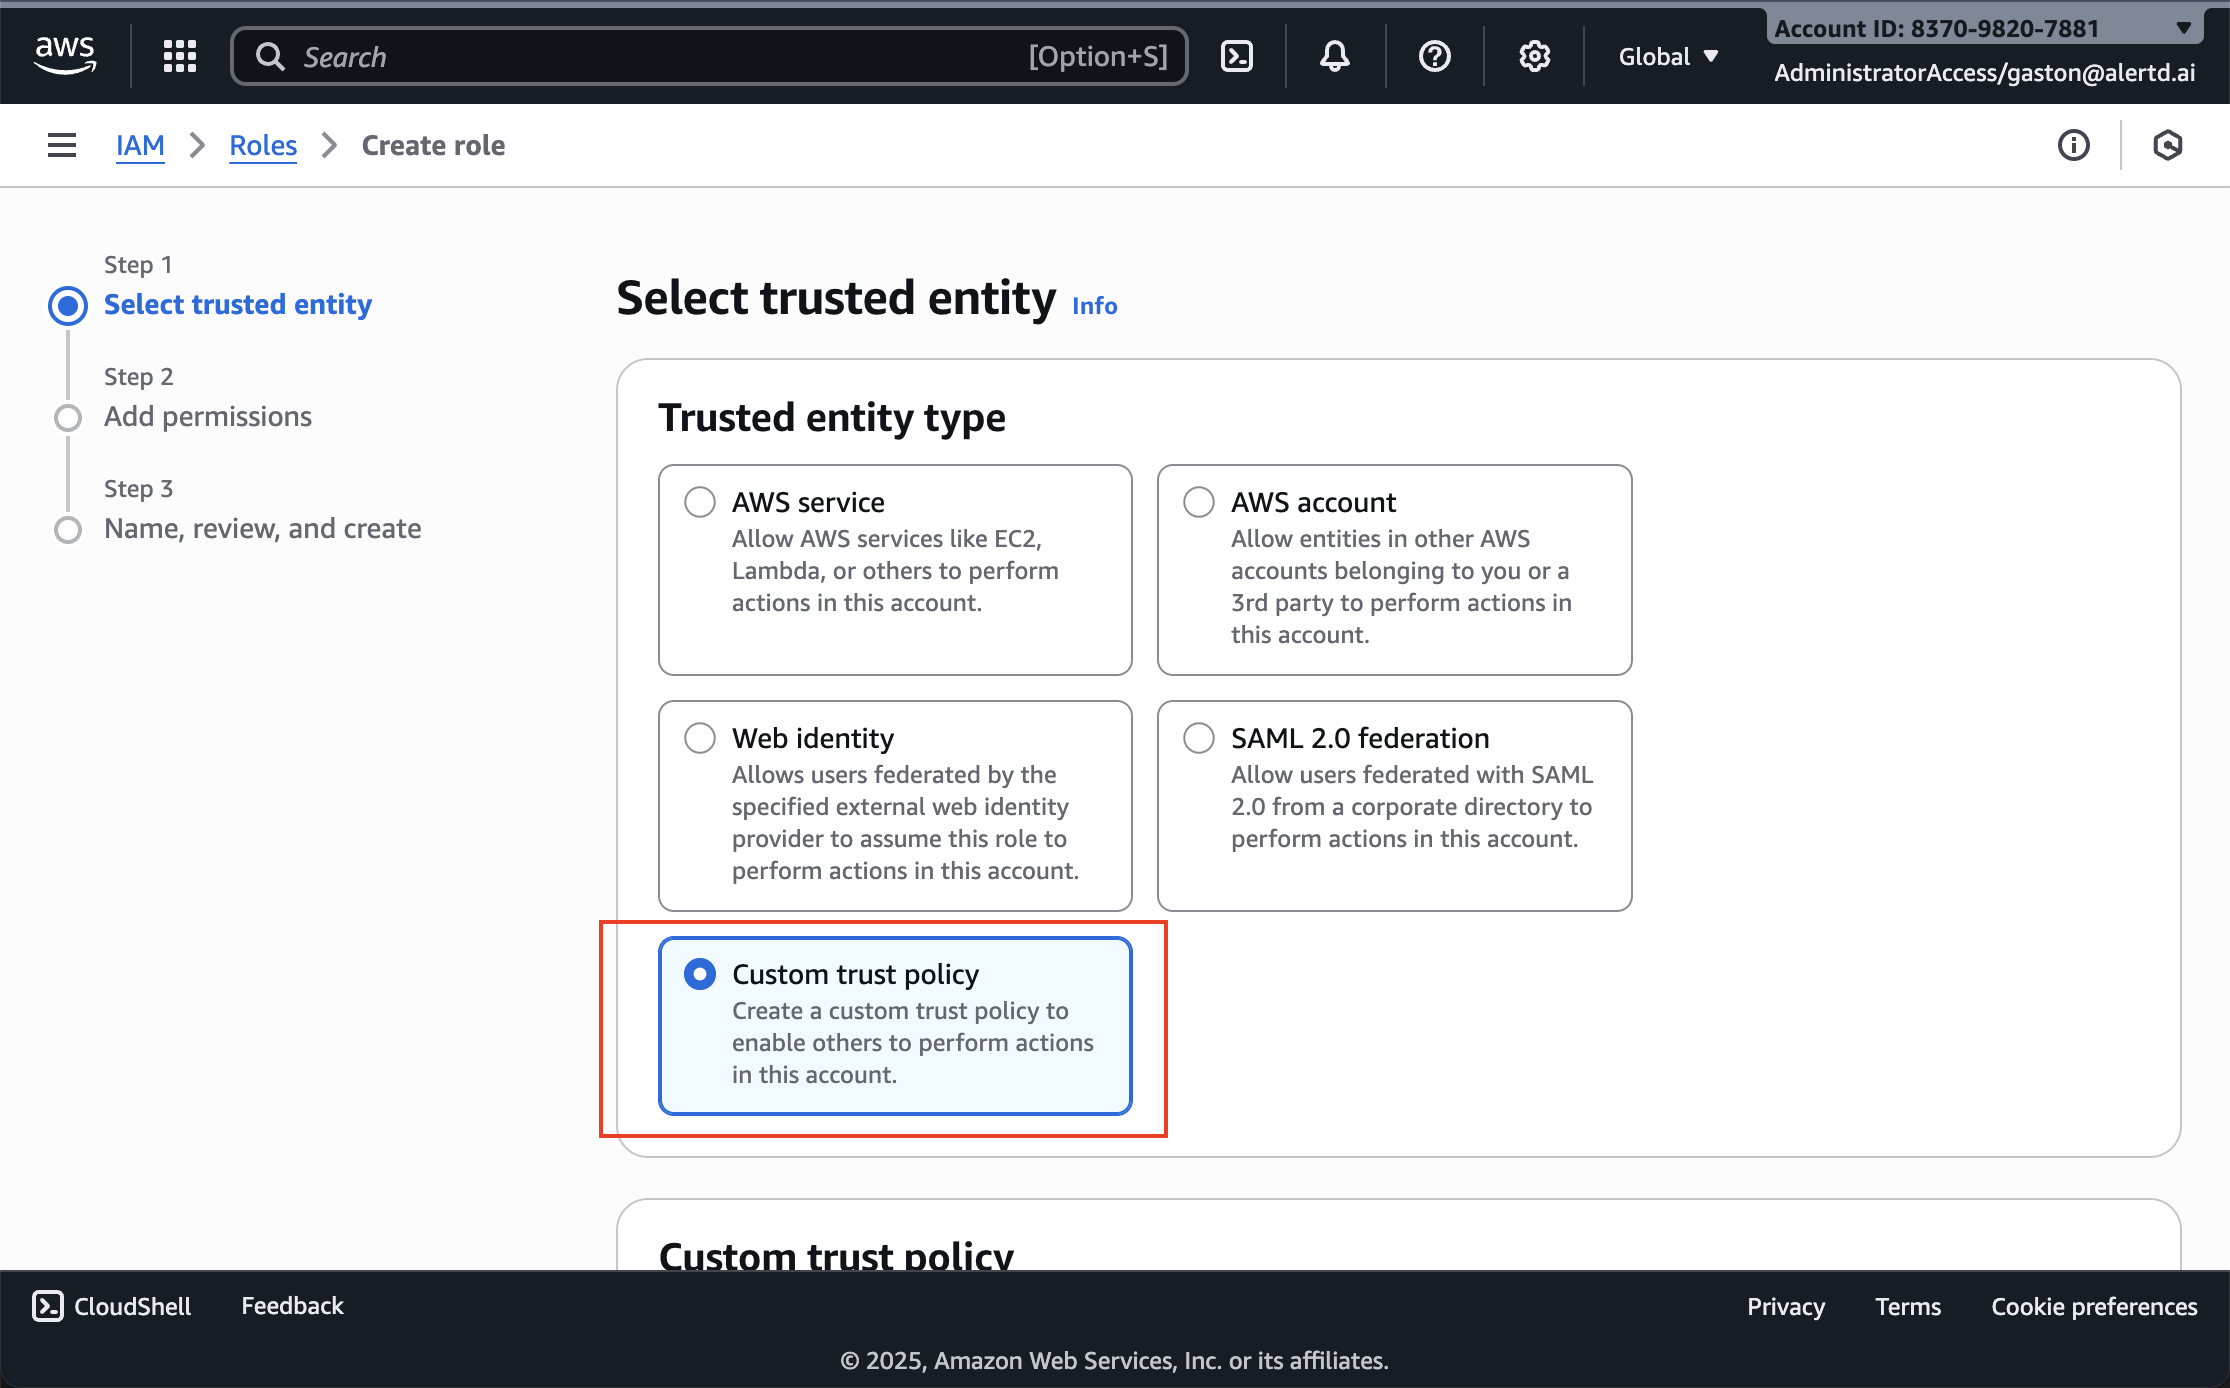
-
On the Select trusted entity page, you’ll see several options:
- AWS service
- AWS account
- Web identity
- SAML 2.0 federation
- Custom trust policy ← Select this option
-
Click Custom trust policy (highlighted with a red border)
Step 9: Paste the Trust Policy
- Return to the AlertD setup tab
- Copy the entire Trust Policy JSON from the AlertD screen
- Return to the AWS IAM Console tab
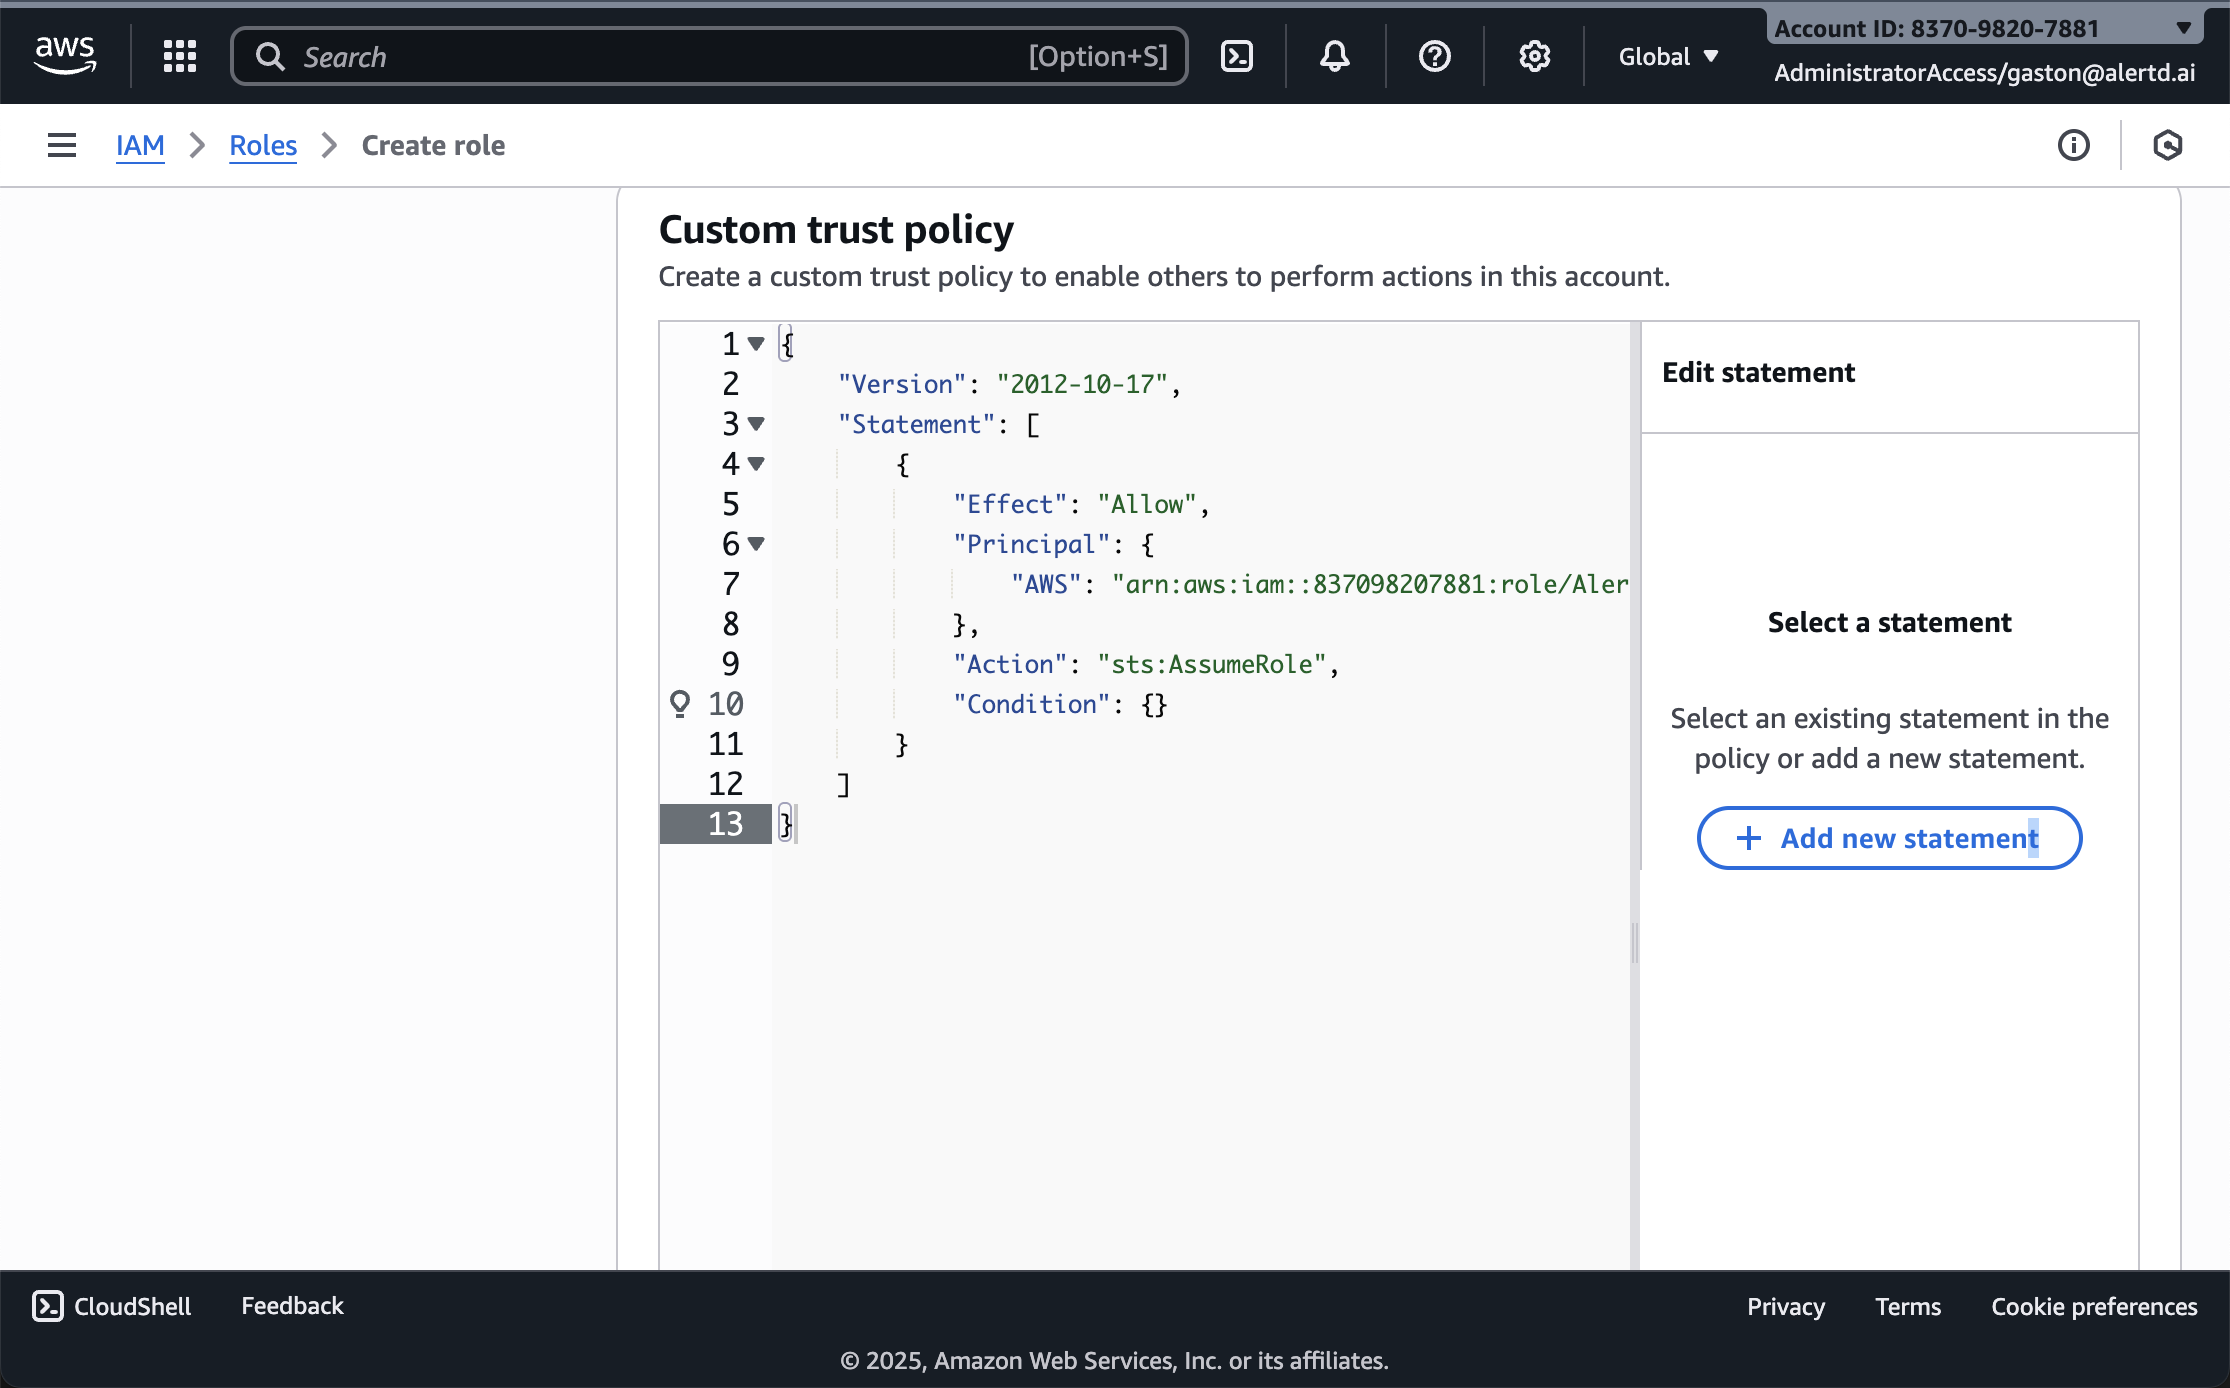
- Paste the trust policy into the Custom trust policy editor
- The policy should show:
- Version:
"2012-10-17" - Principal AWS ARN matching your AlertD deployment
- Action:
"sts:AssumeRole"
- Version:
- Click Next at the bottom of the page
Step 10: Add Permissions
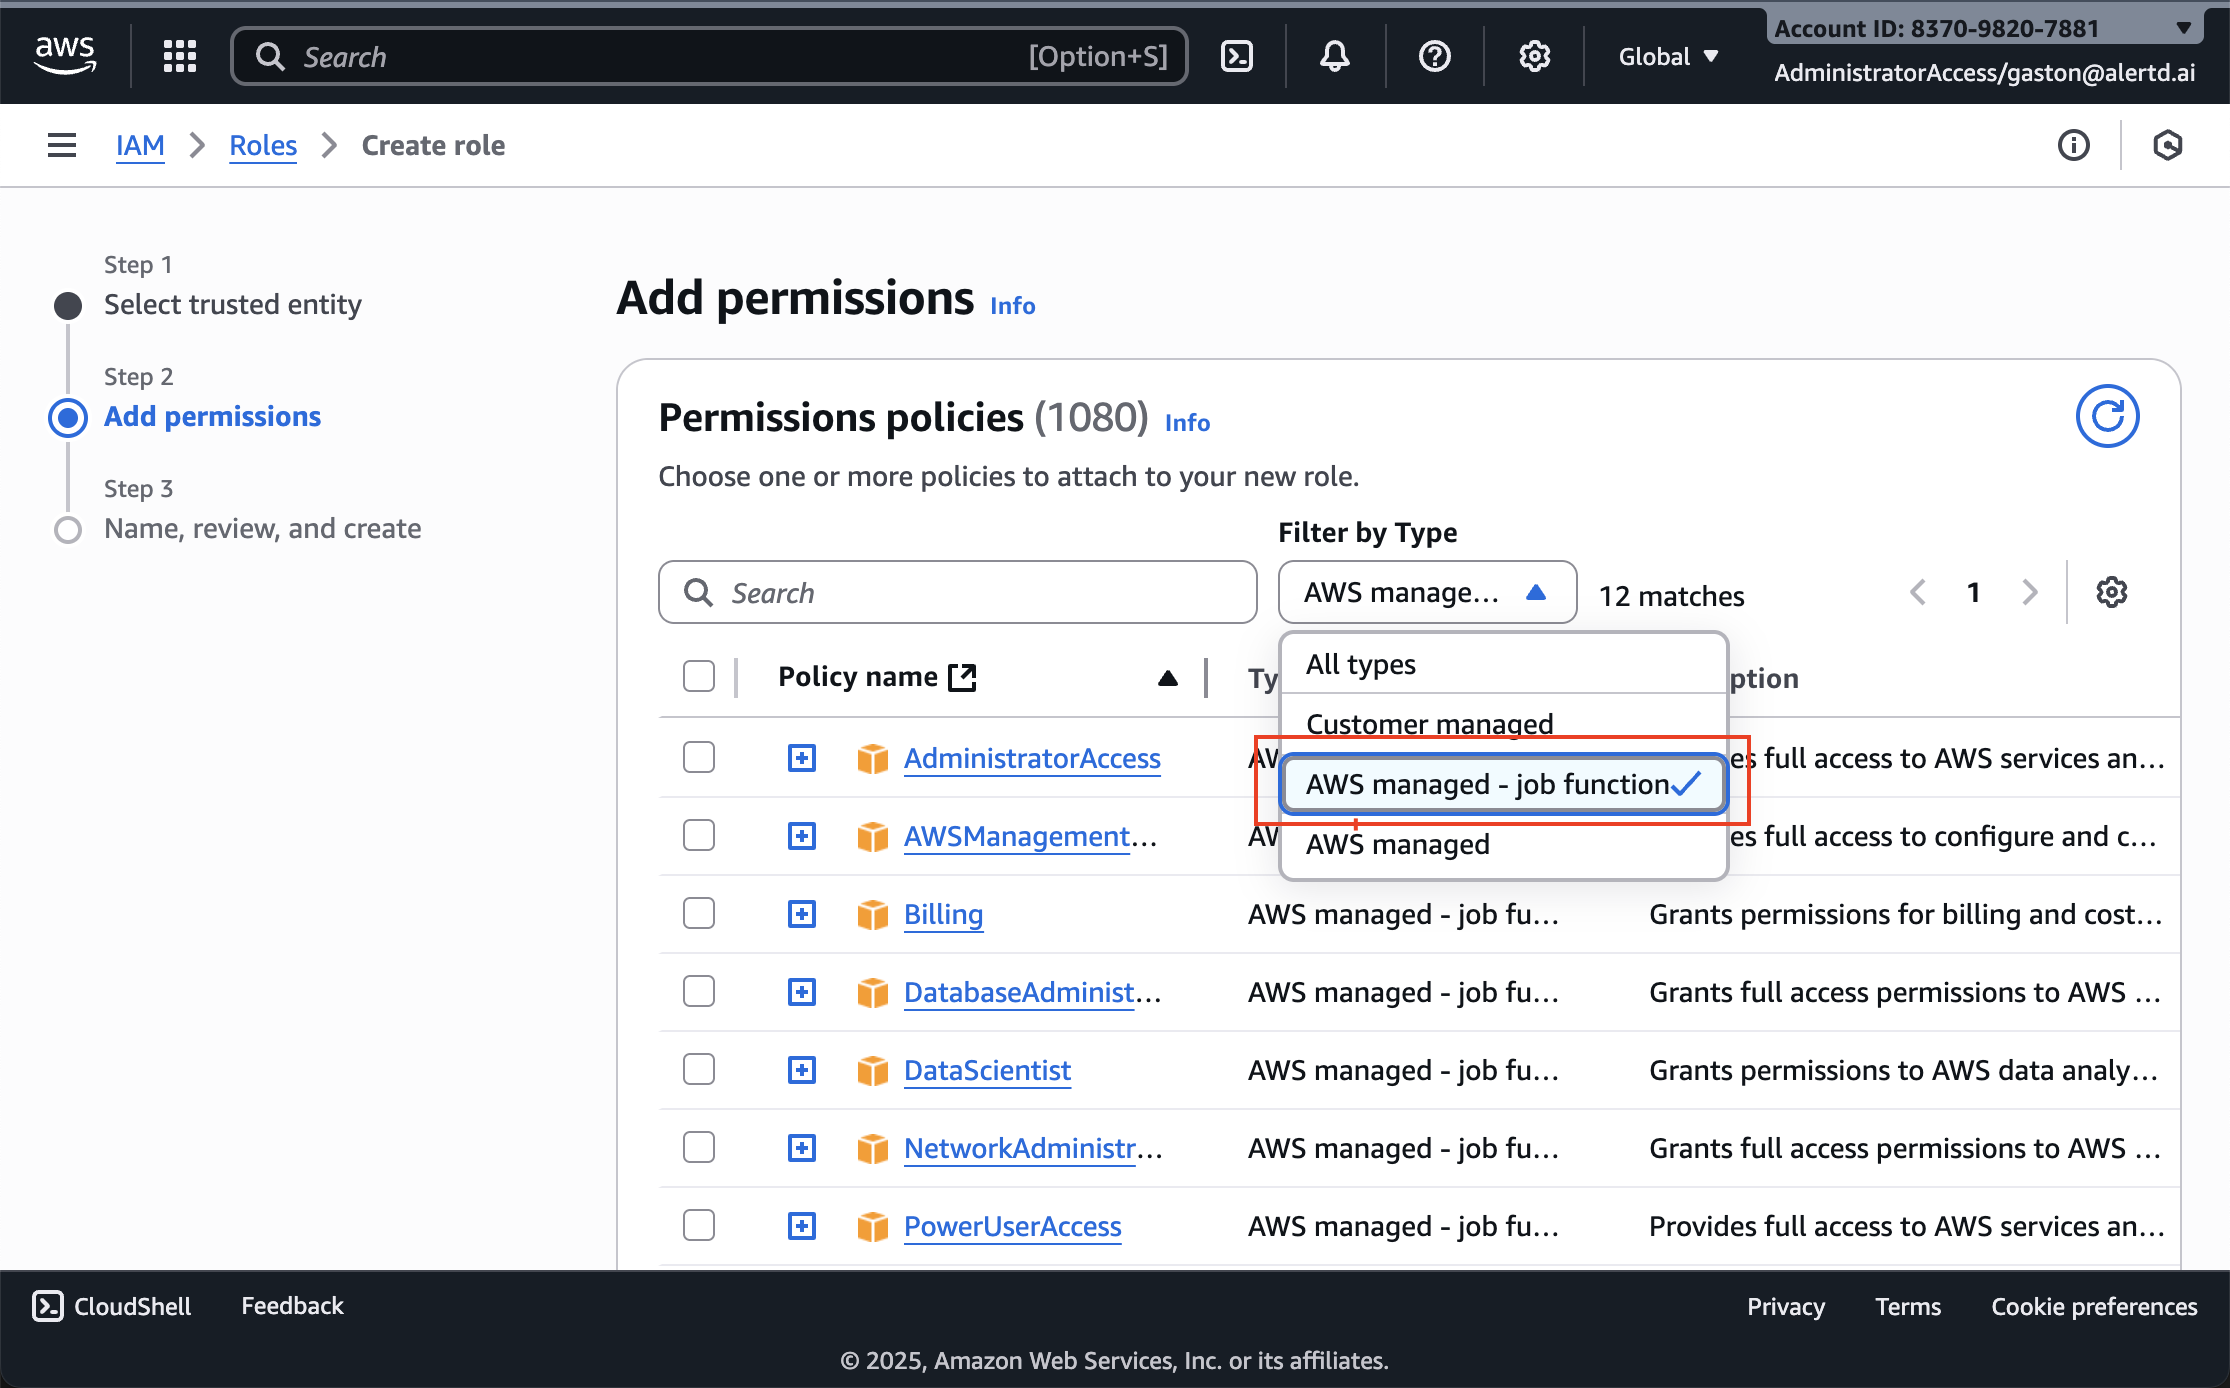
- On the Add permissions page, you’ll see a list of AWS managed policies
- Click the Filter by Type dropdown
- Select AWS managed - job function
- This filters to AWS-curated policies for specific job roles
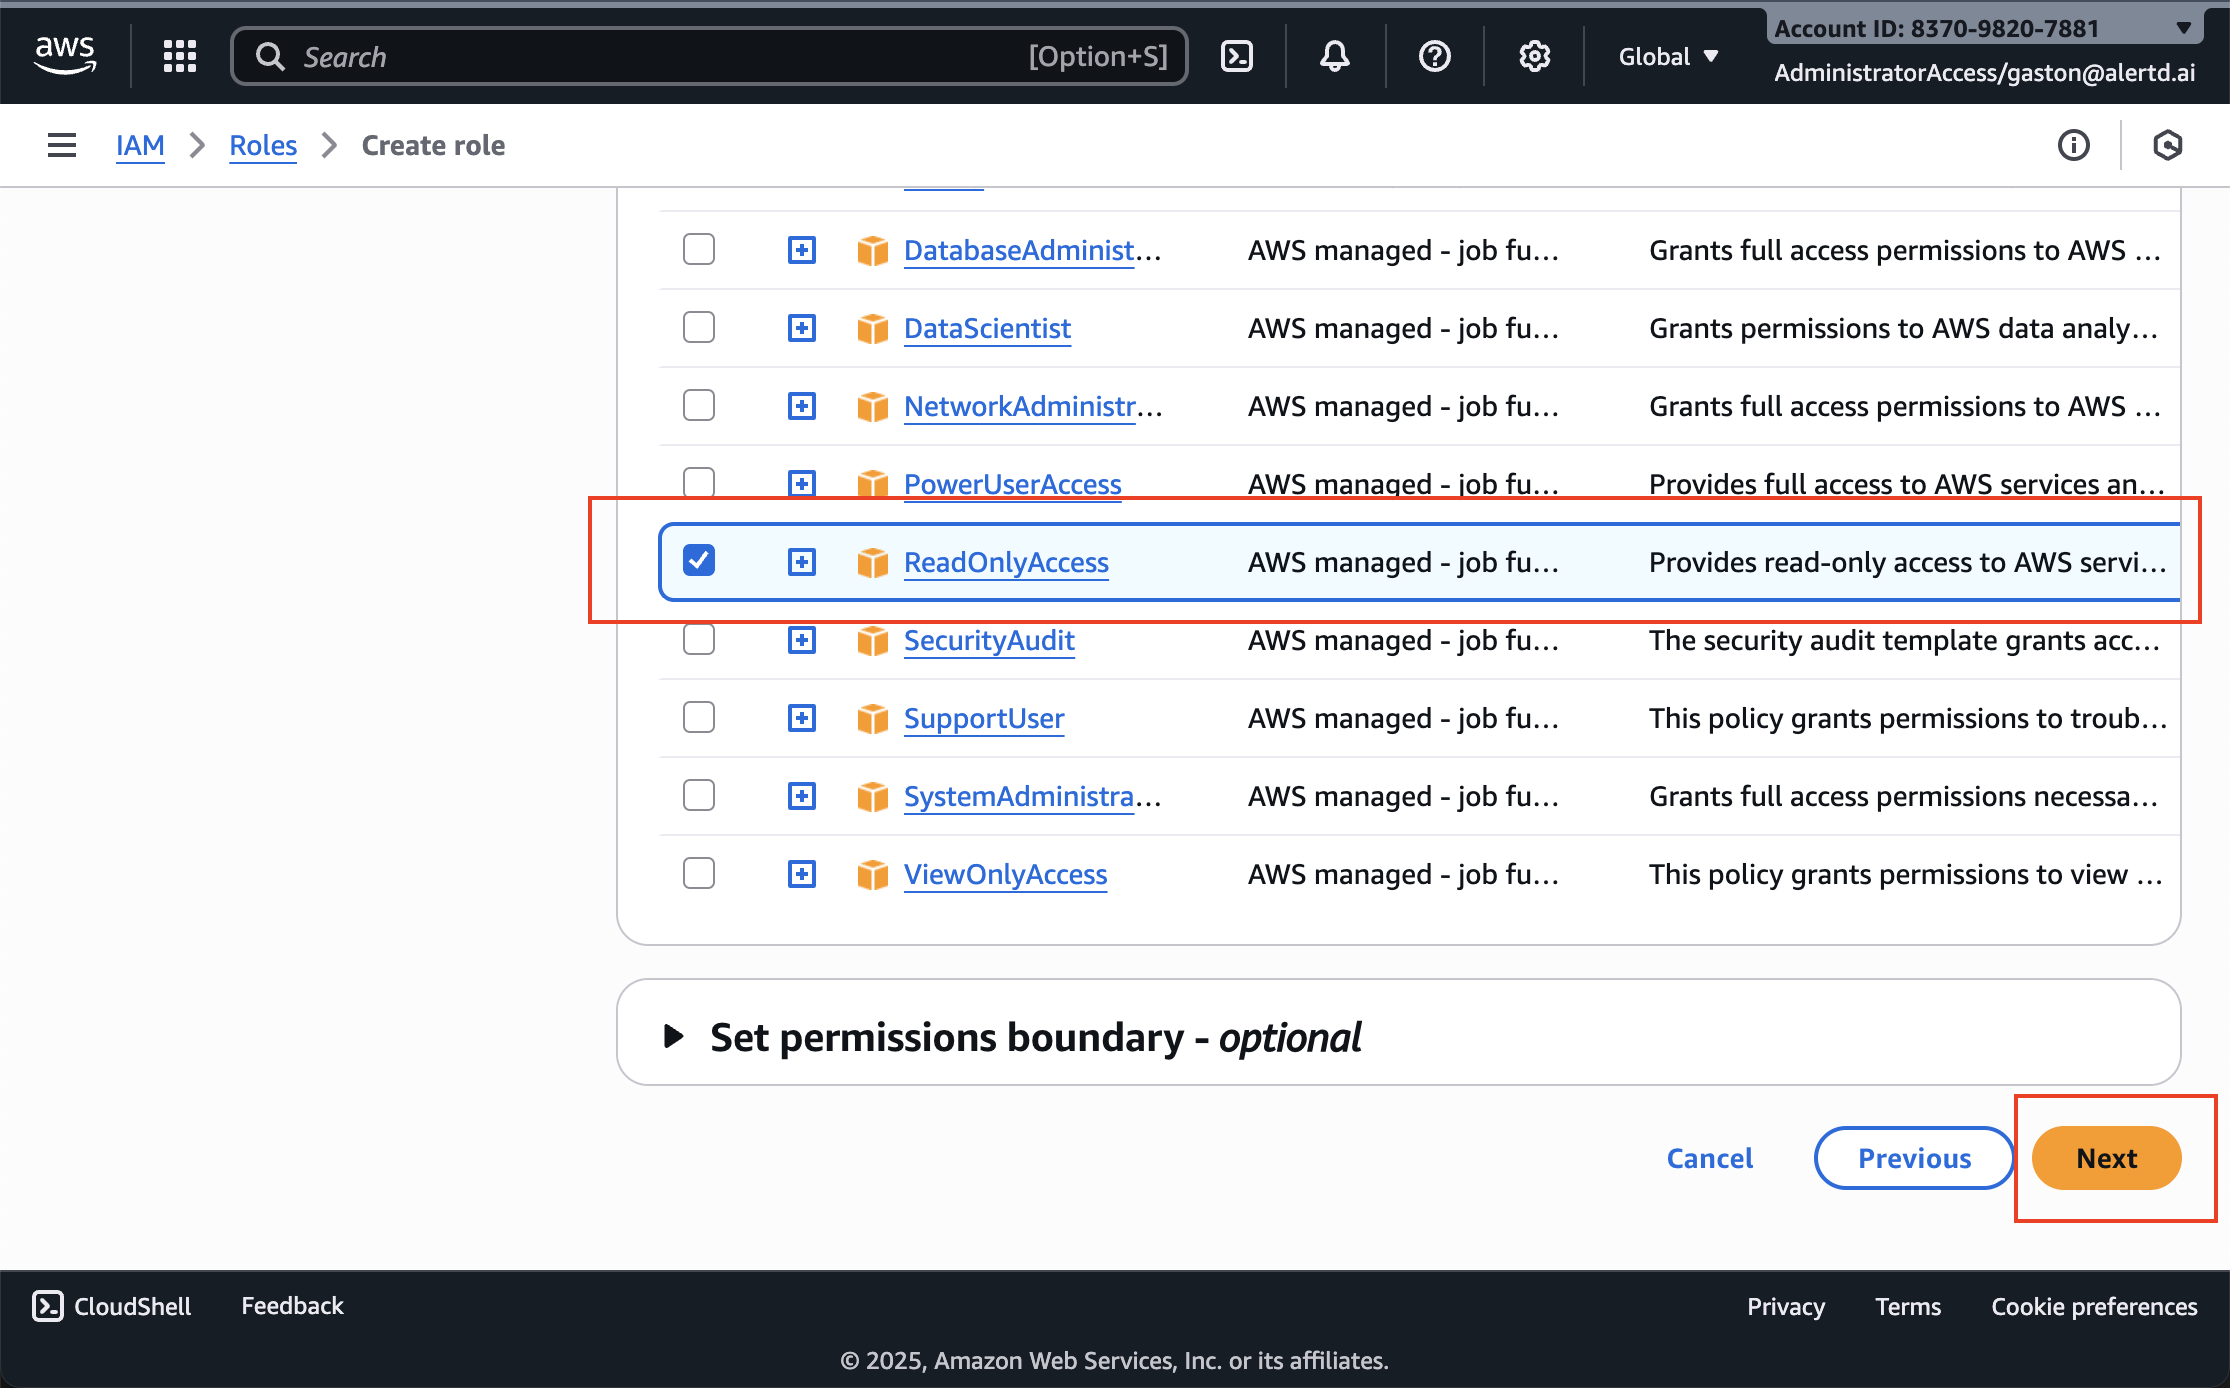
- In the search box or policy list, find ReadOnlyAccess
- Check the box next to ReadOnlyAccess
- This AWS-managed policy provides read permissions across all AWS services
- It includes CloudWatch, EC2, S3, RDS, and 100+ other services
- Click Next to proceed to naming
Step 11: Name the Role
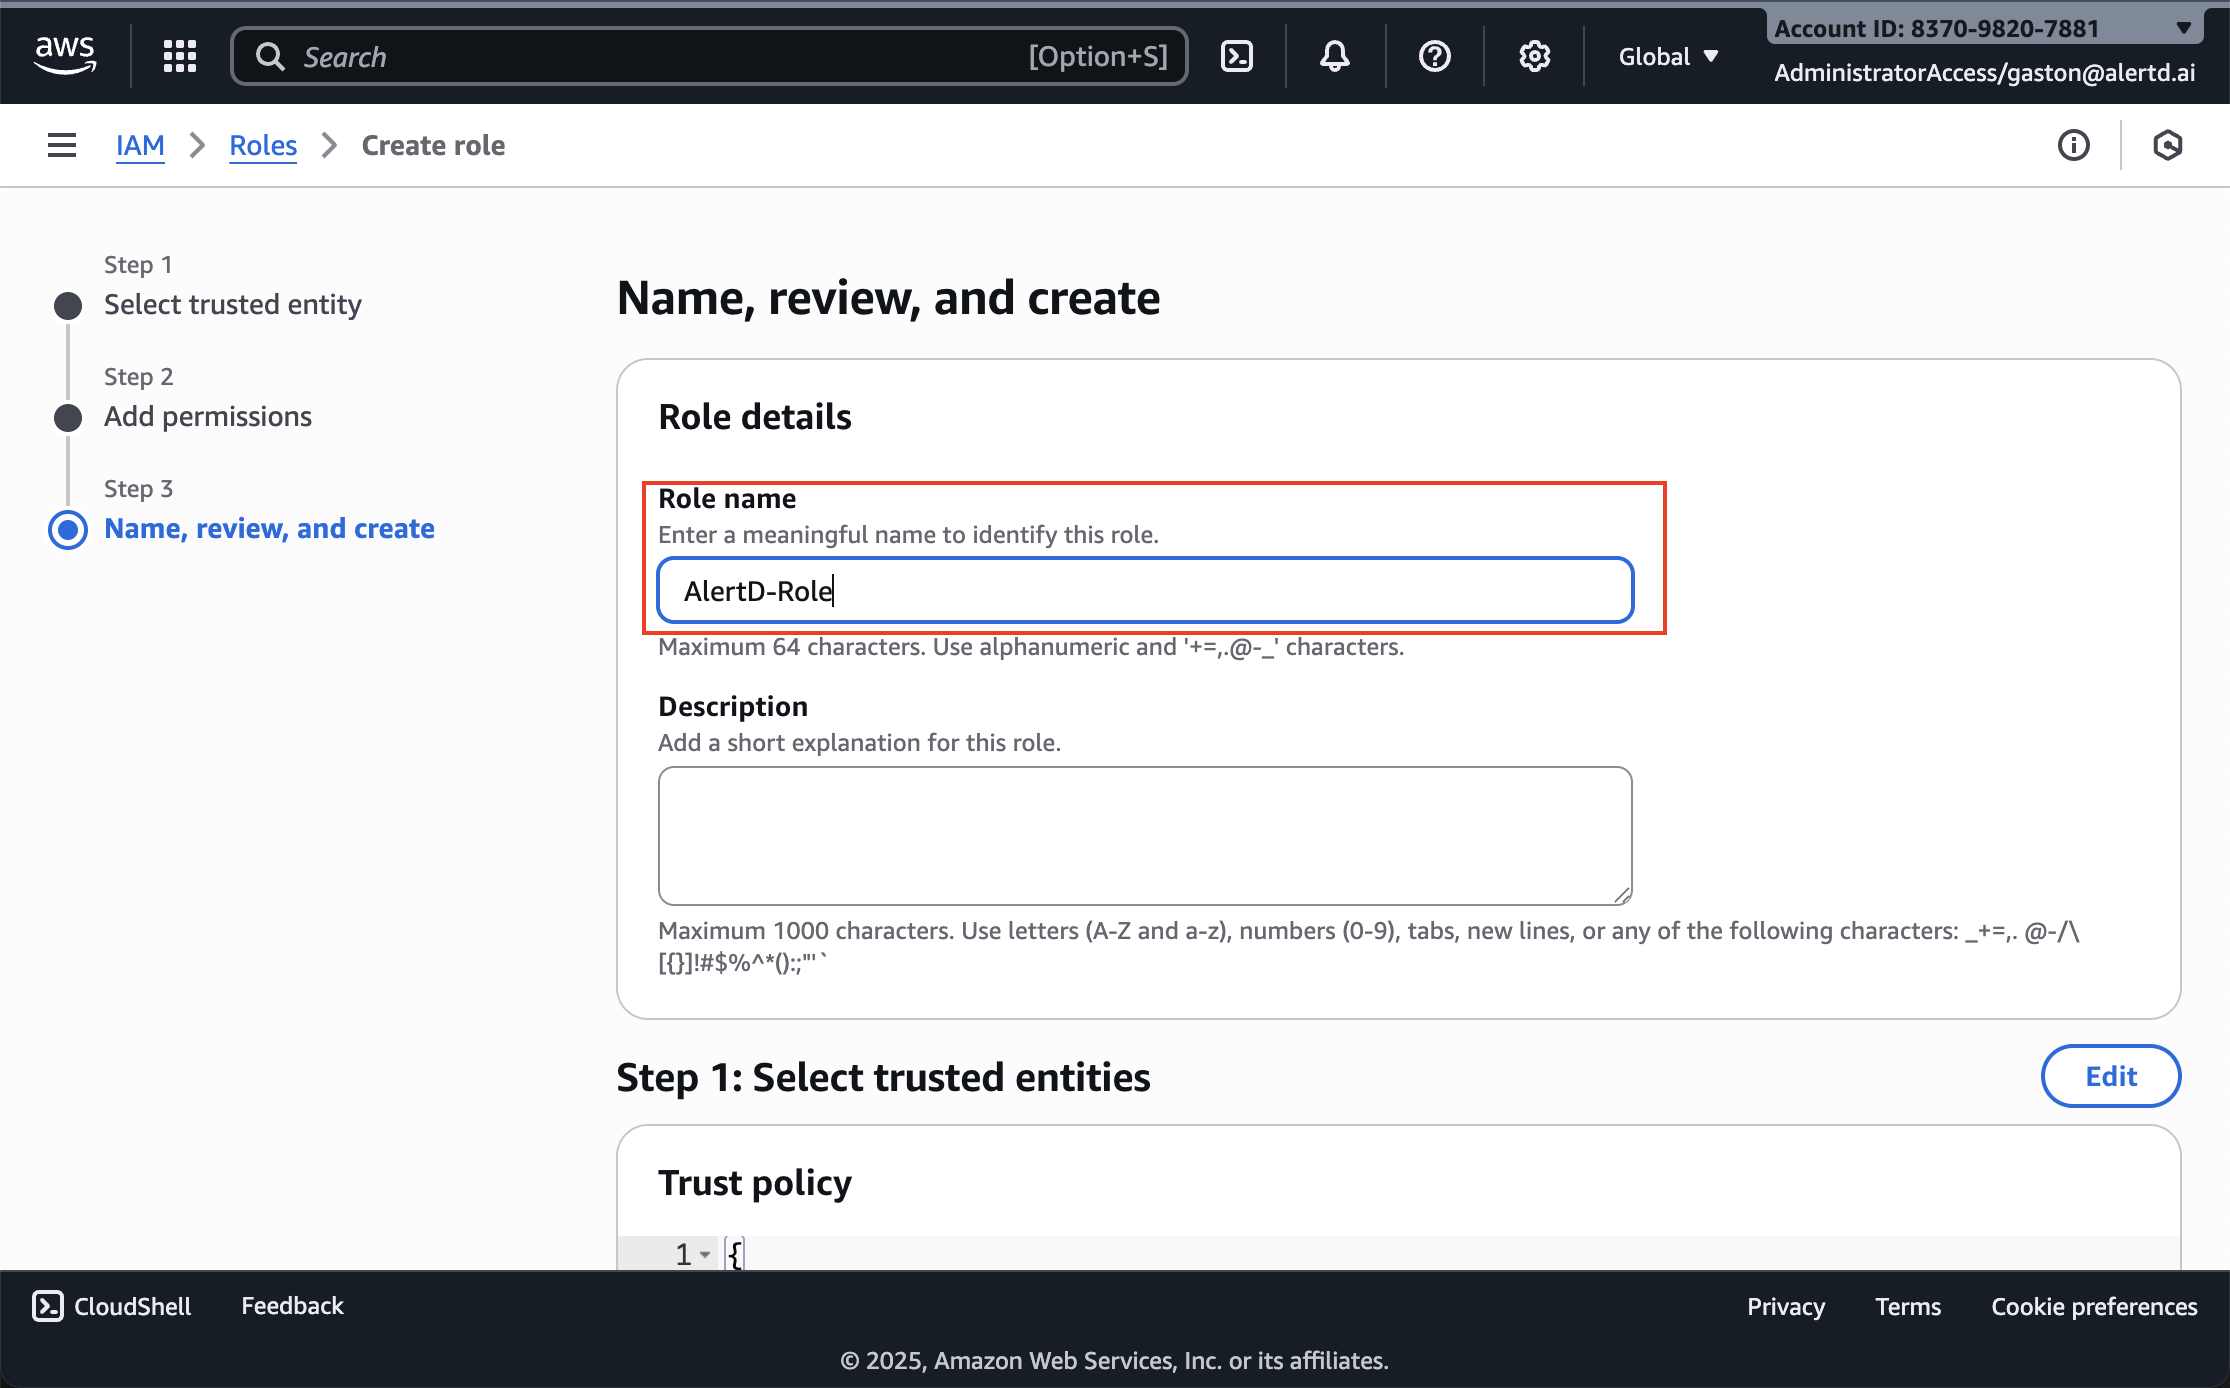
- On the Name, review, and create page:
- Role name: Enter
AlertD-Role(or your preferred name) - (Optional) Description: Add a note like “Read-only access for AlertD agent”
- Review the Trust policy and Permissions policies sections
- Verify that:
- Trust policy shows the correct Principal ARN
- Permissions list includes ReadOnlyAccess
- Click Create role at the bottom
Step 12: Copy the Role ARN
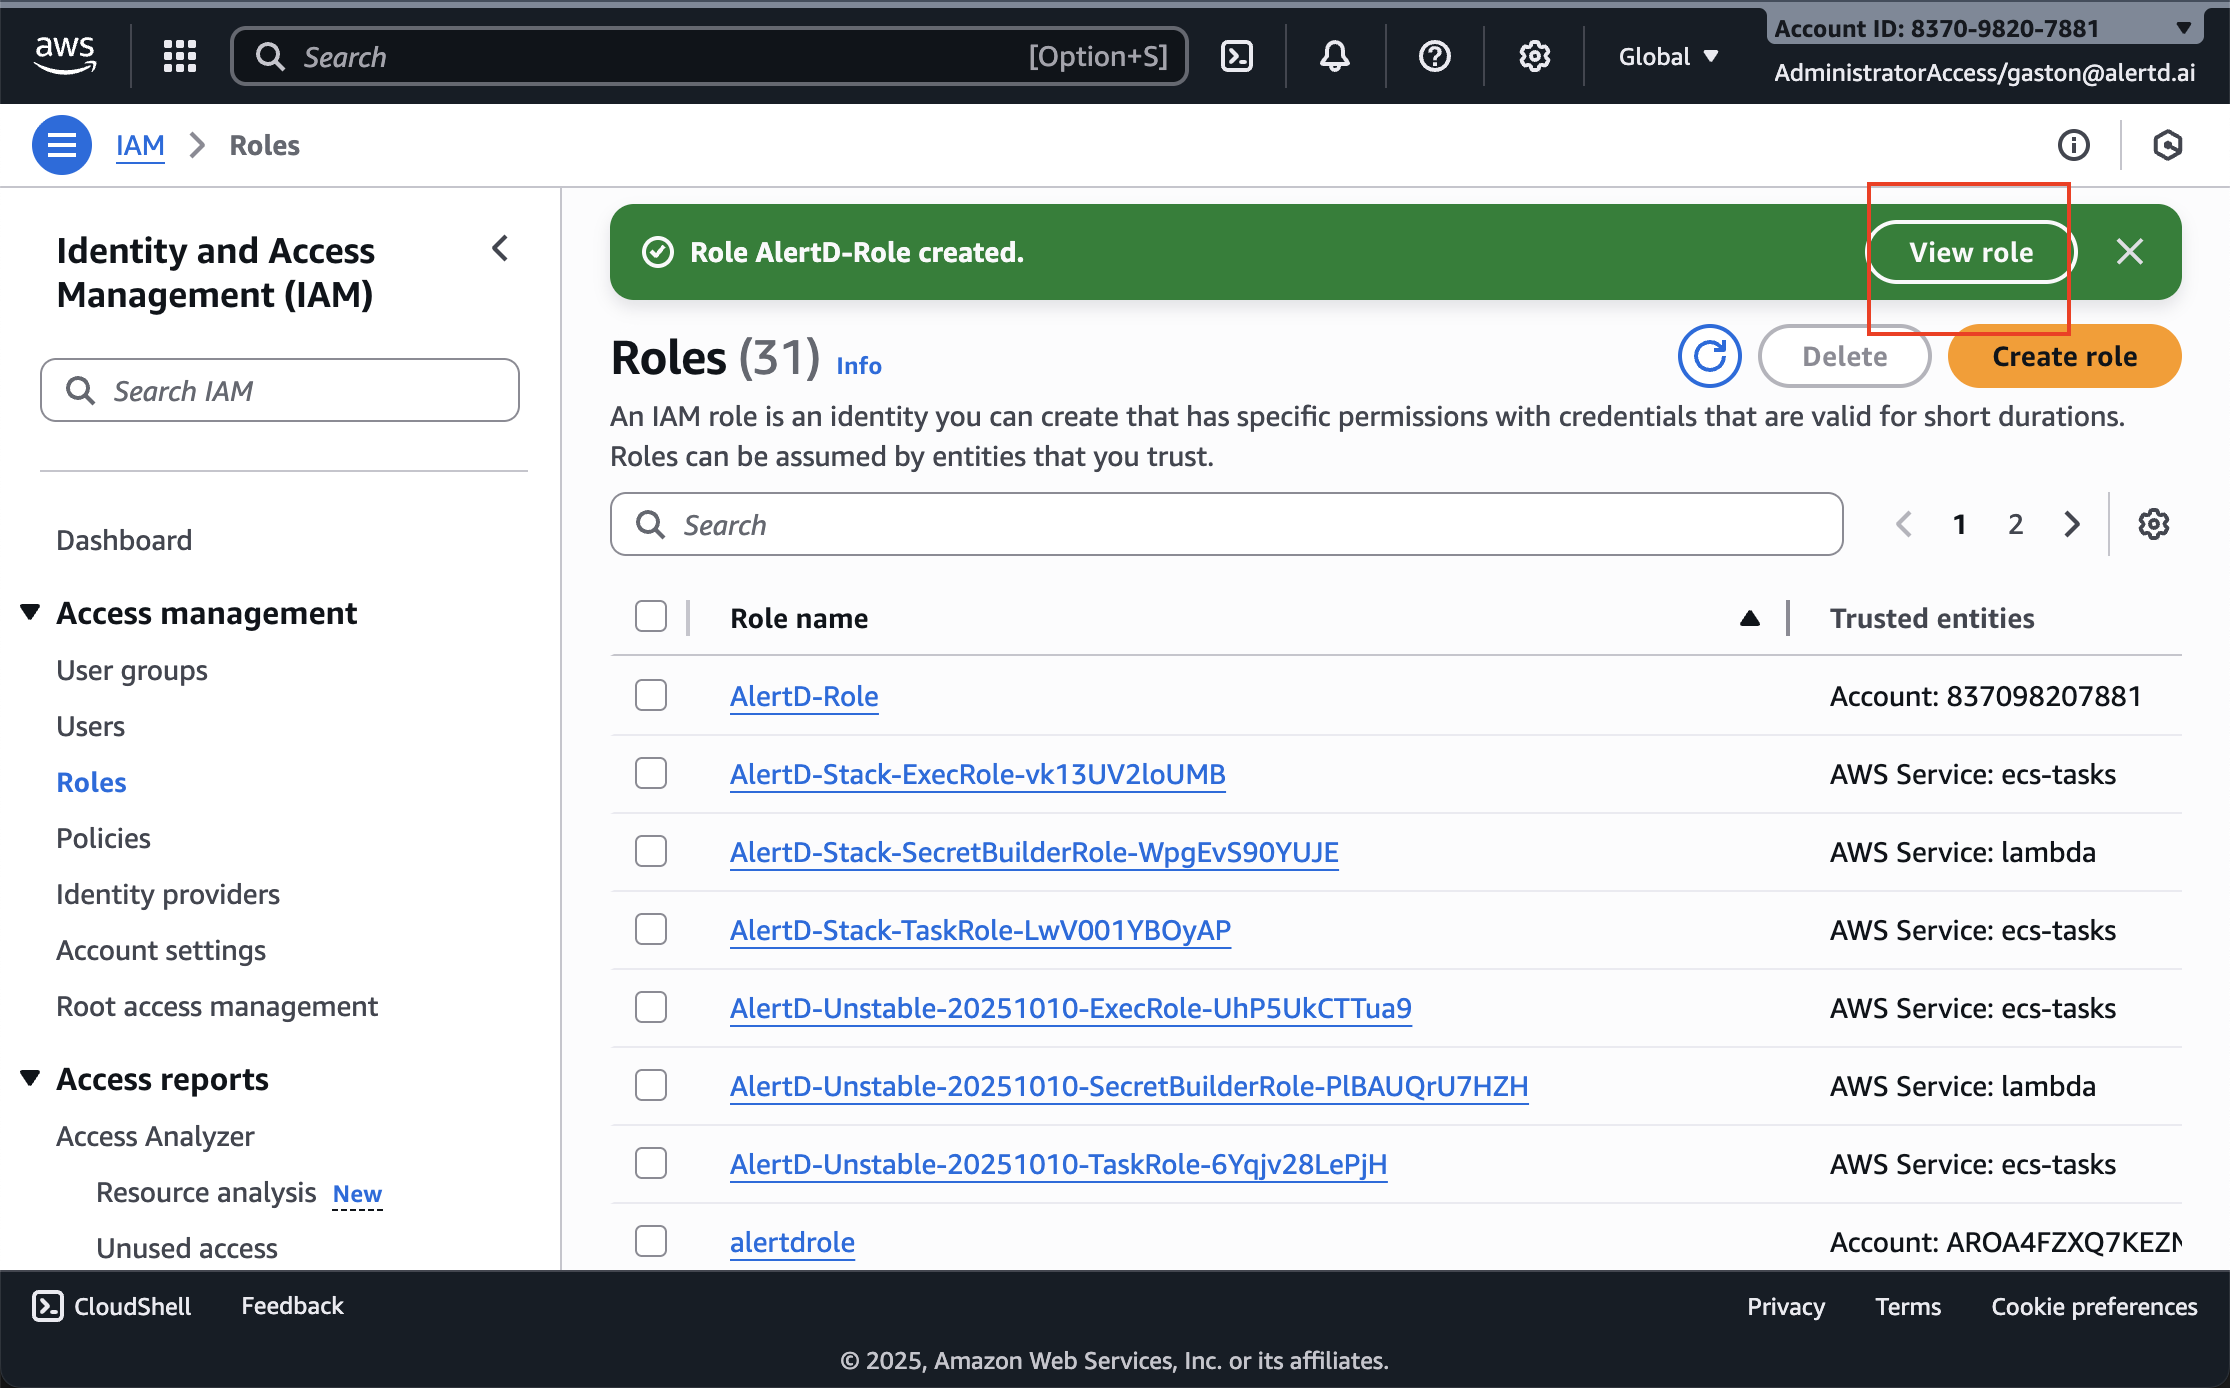
- After role creation, you’ll see a green success banner: “Role AlertD-Role created”
- Click View role to open the role details
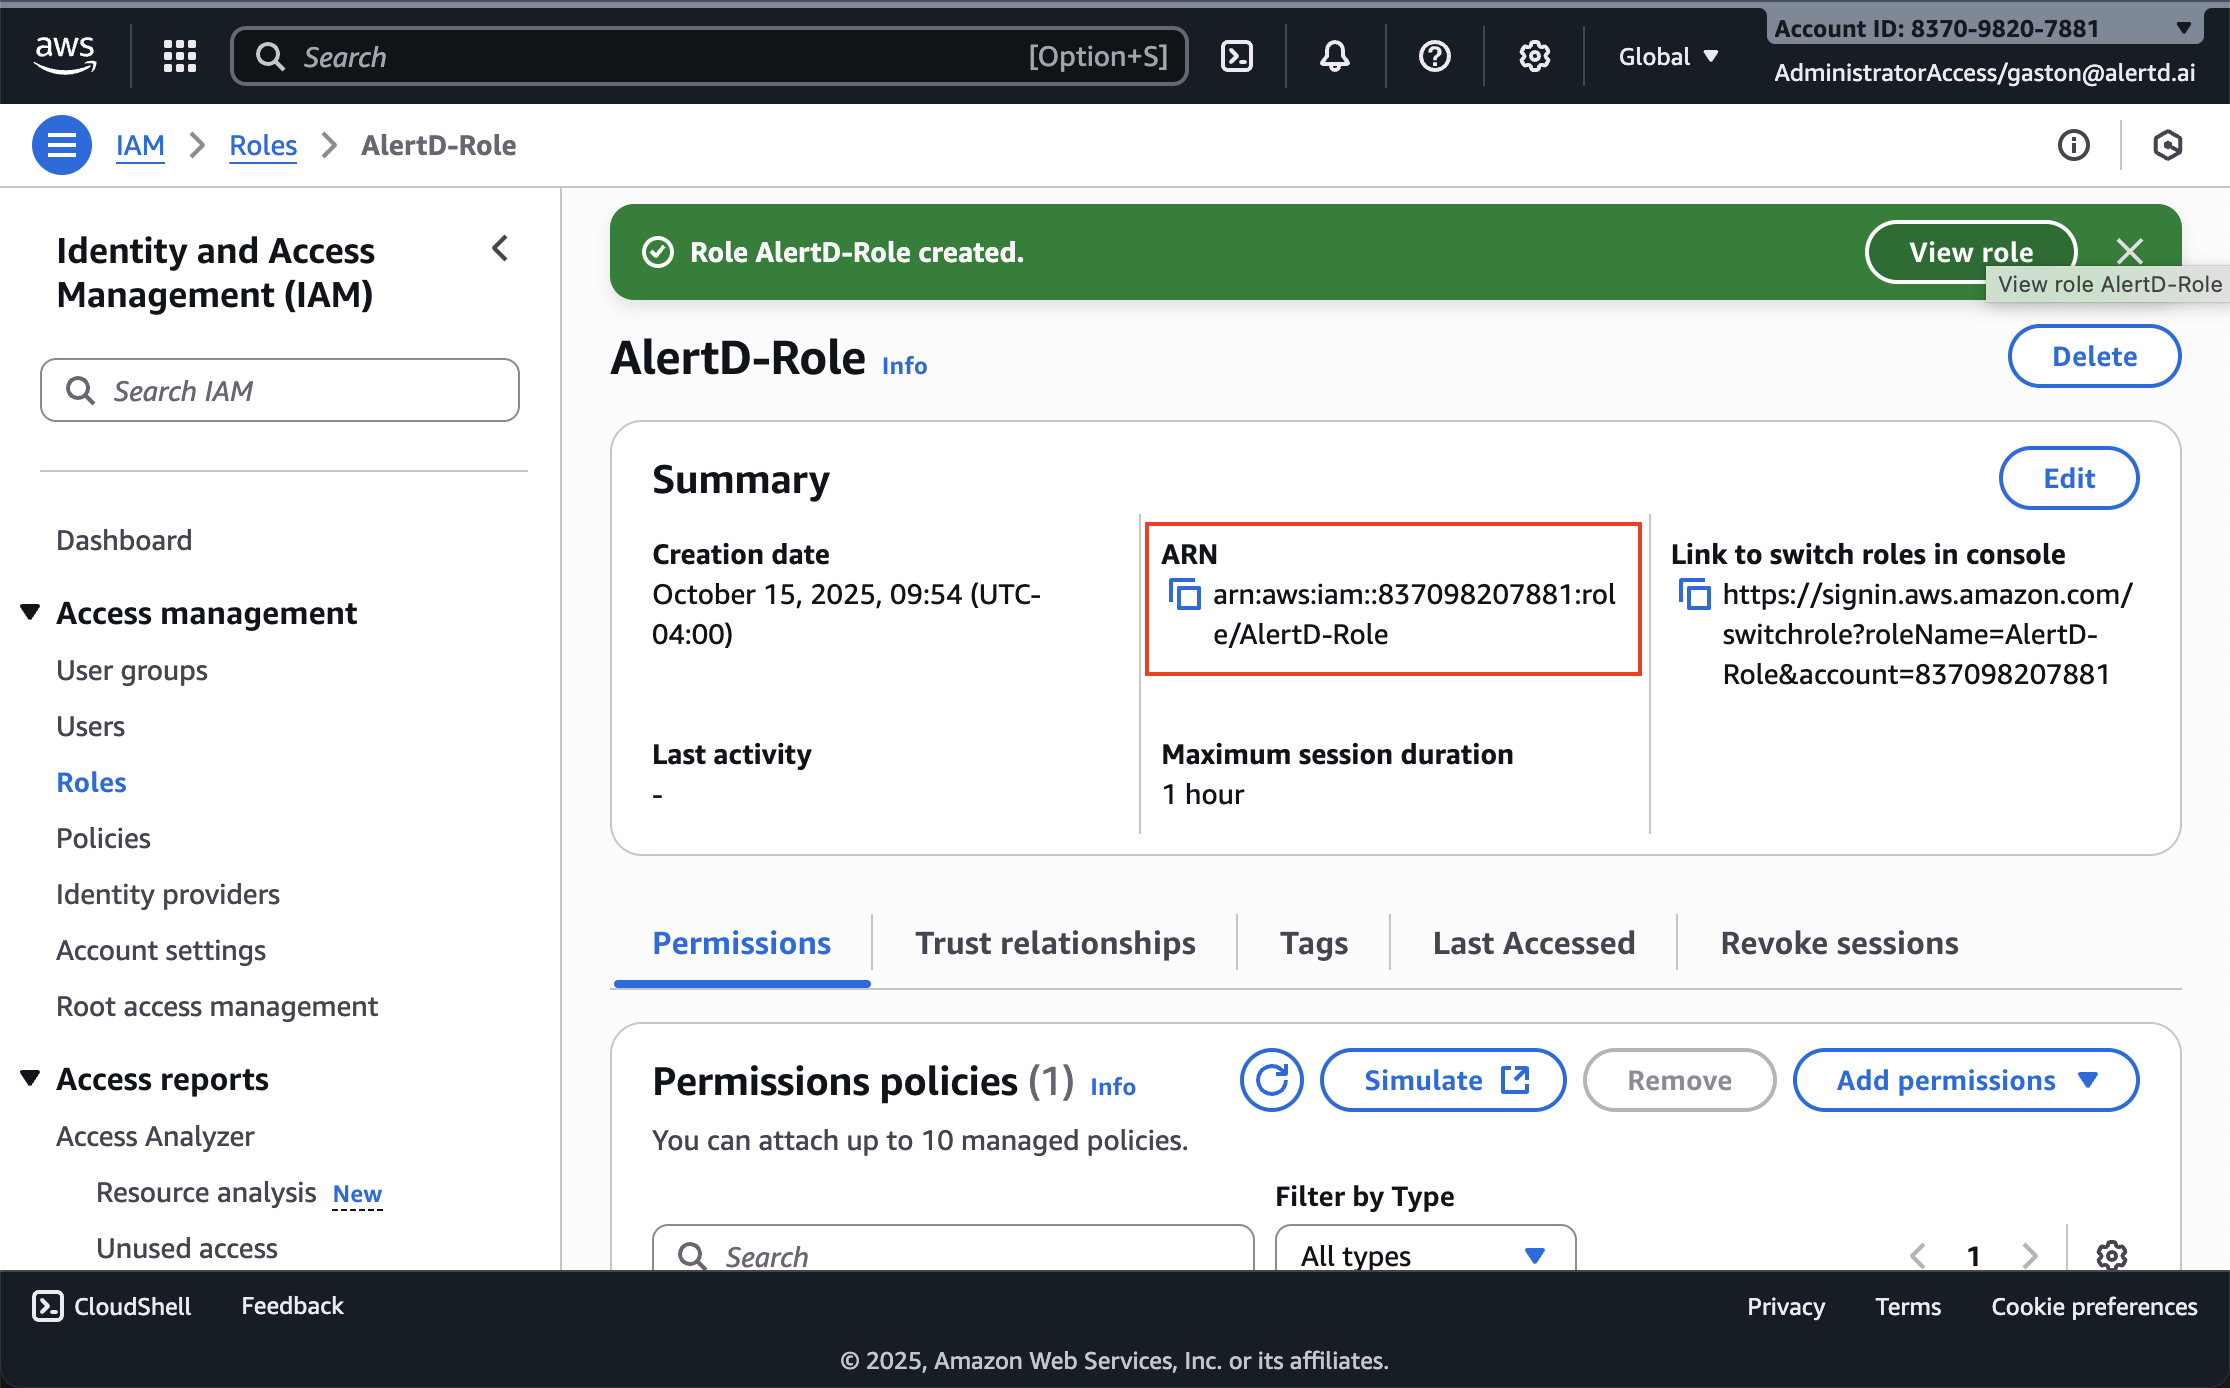
- The role summary page displays:
- Role name
- Creation date
- Permissions policies (ReadOnlyAccess)
- Trust relationships
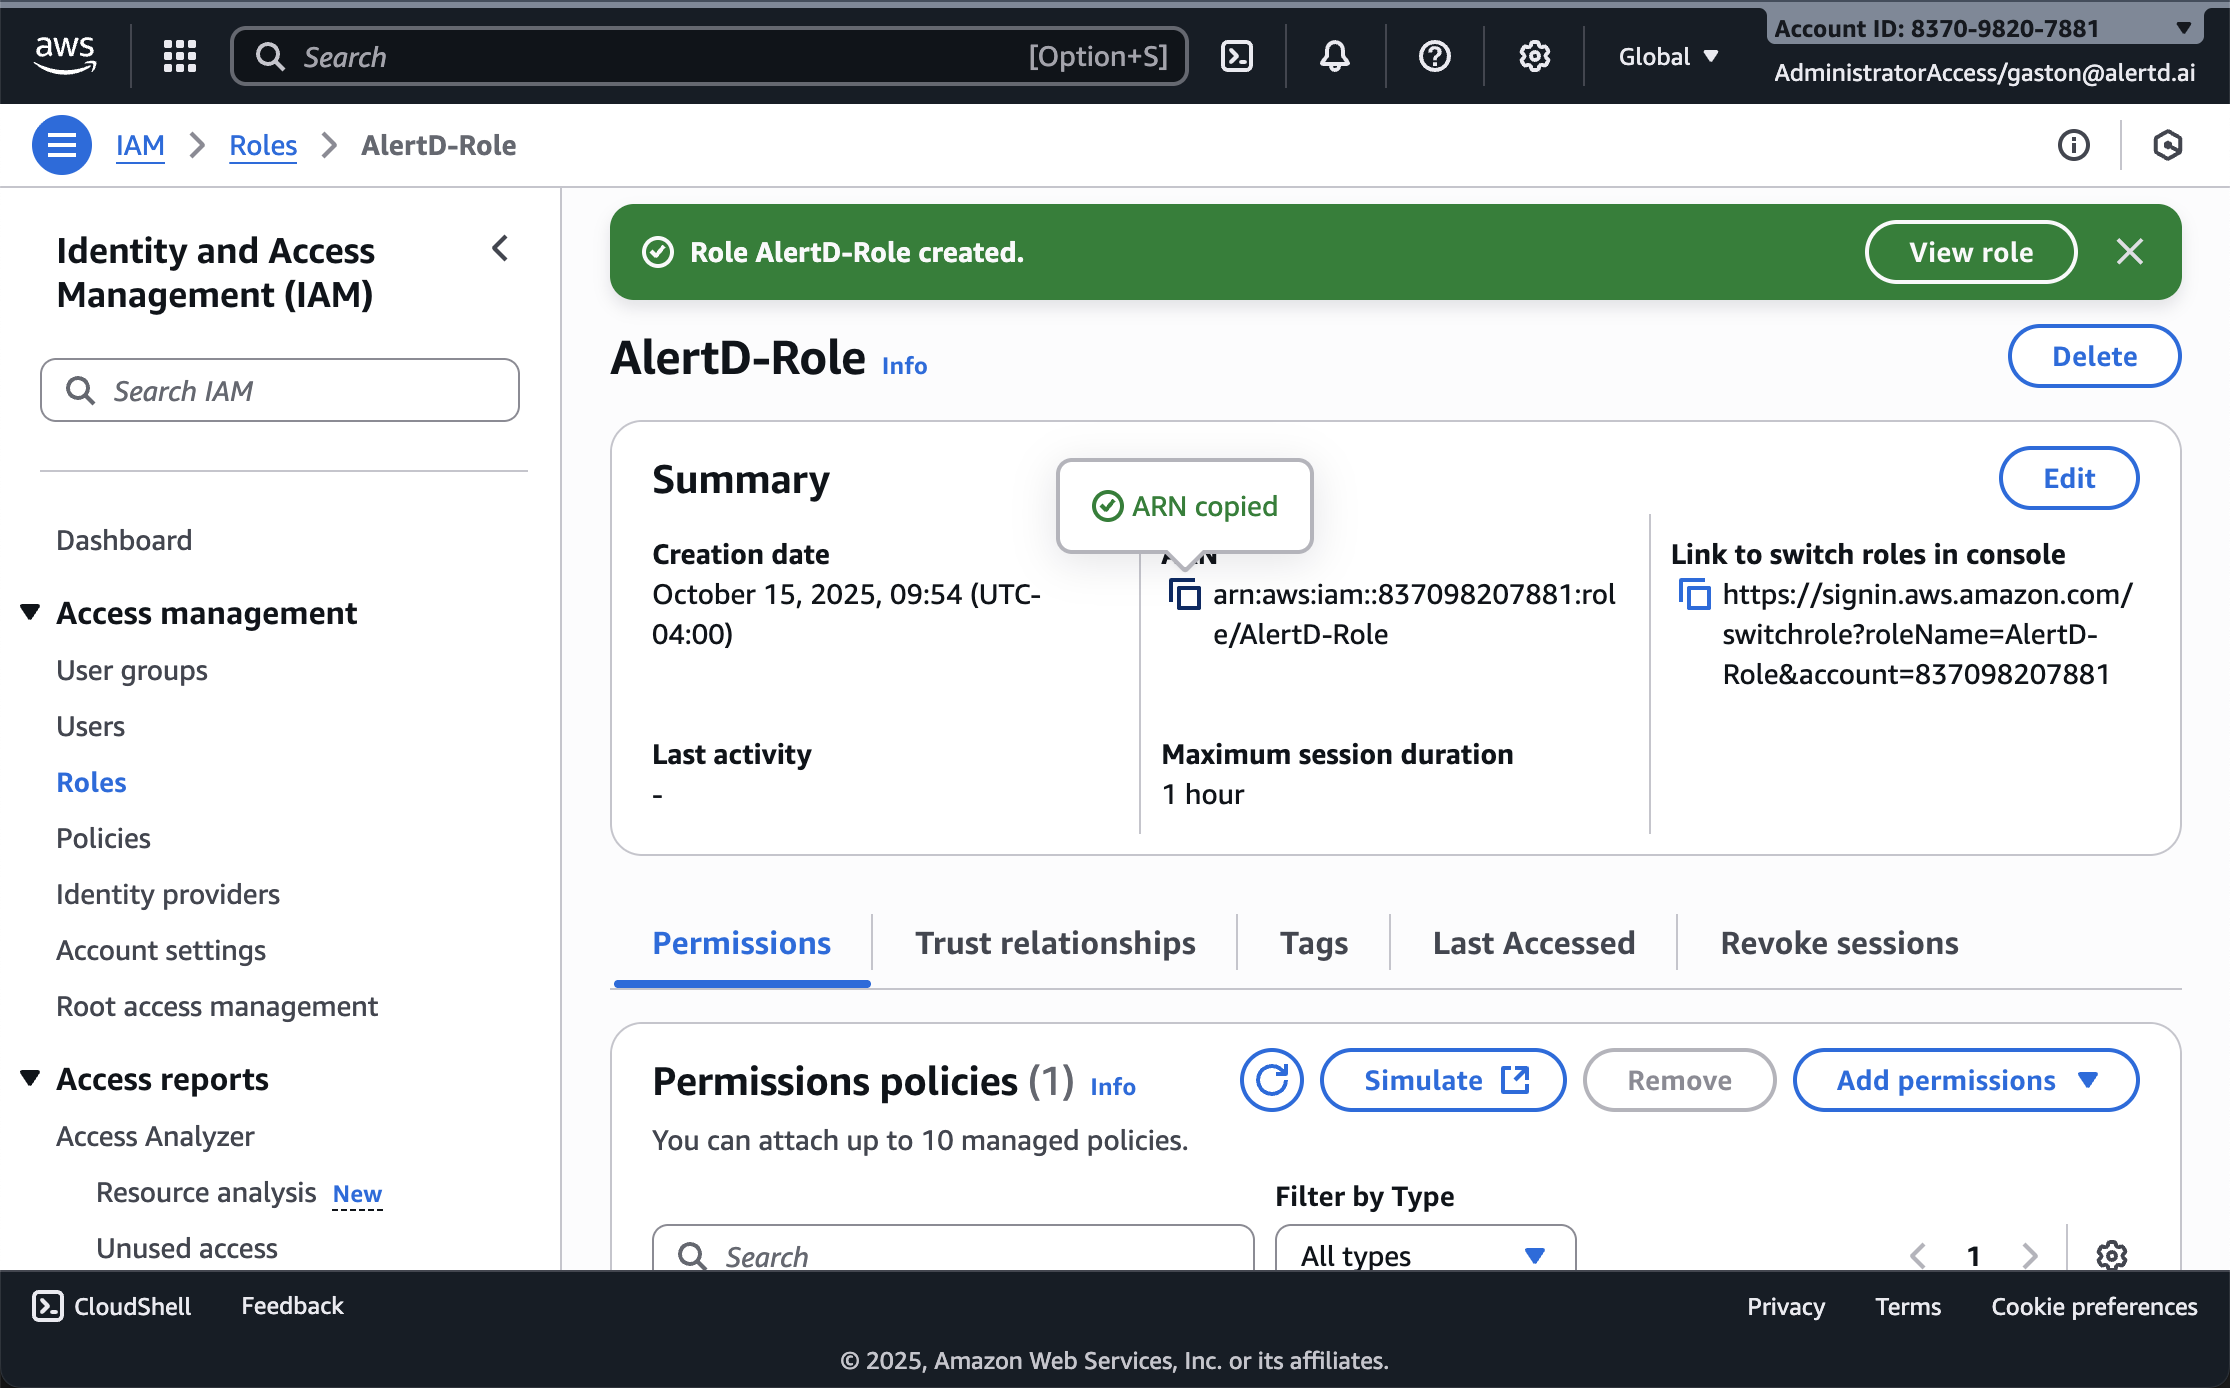
- Locate the ARN field in the summary section
- The ARN format:
arn:aws:iam::837098207881:role/AlertD-Role - Click the copy icon next to the ARN to copy it to your clipboard
Important: Save this ARN! You’ll need it in the next step to complete AlertD setup.
Phase 4: Complete AlertD Configuration
Step 13: Enter Role ARN in AlertD
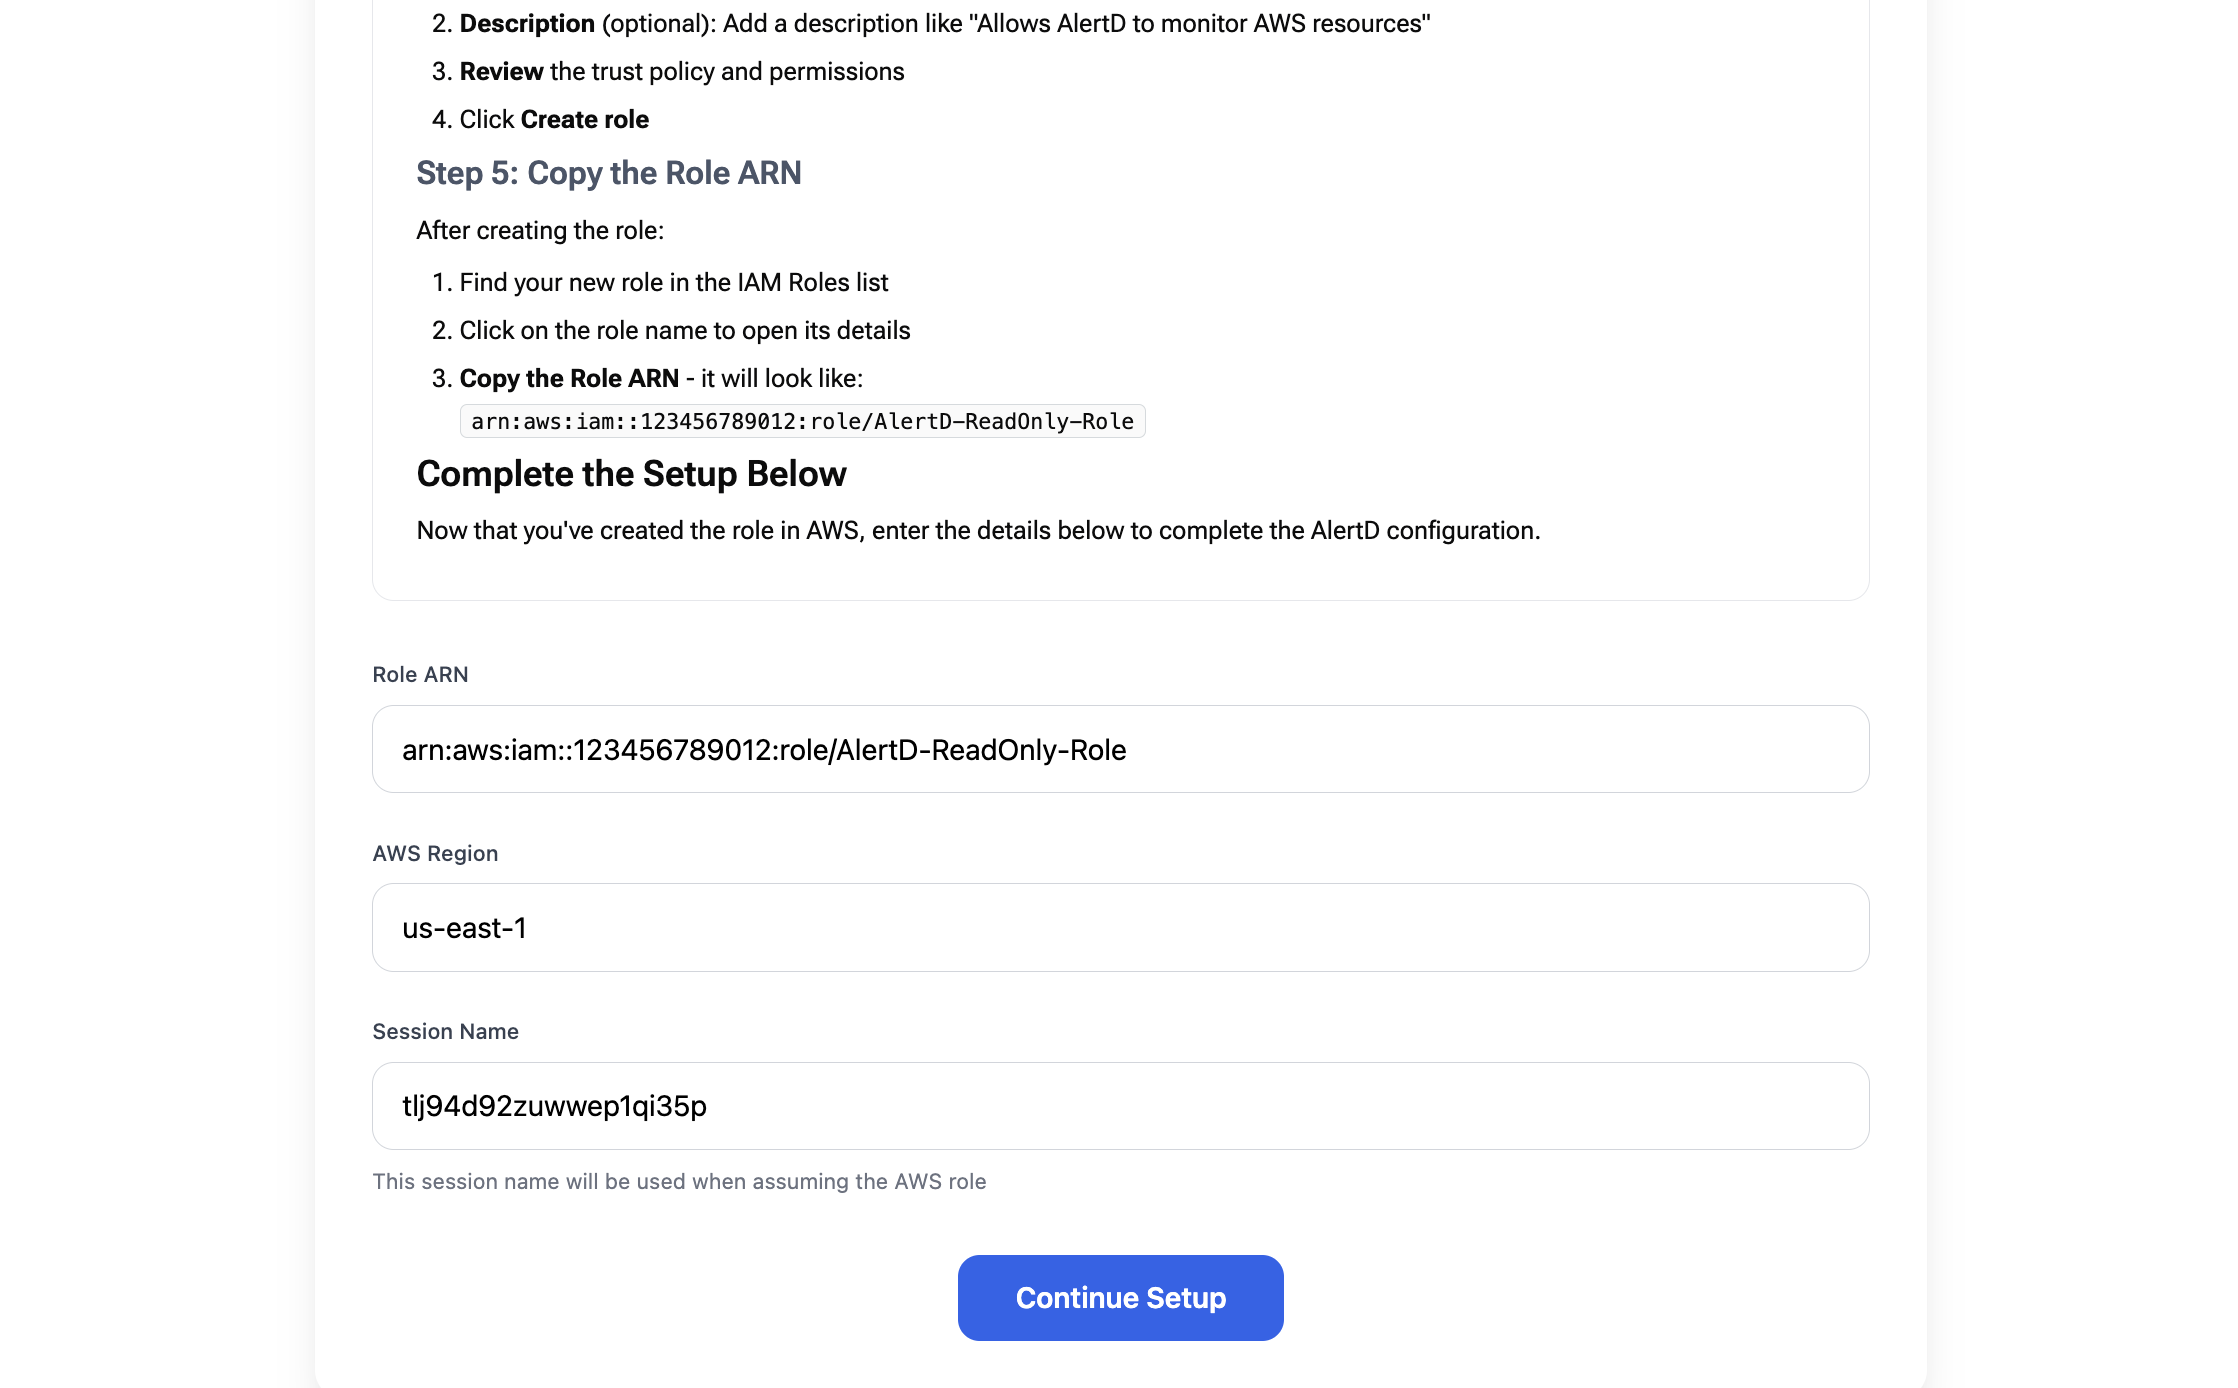
- Return to the AlertD setup tab in your browser
- Paste the Role ARN you copied into the Role ARN field
- Example:
arn:aws:iam::837098207881:role/AlertD-Role
- Example:
- Select your AWS Region from the dropdown
- Choose the region where most of your resources reside
- Example:
us-west-1,us-east-1,eu-west-1
- Click Continue Setup
AlertD will now:
- Validate the IAM role ARN
- Test the AssumeRole permissions
- Verify it can access CloudWatch
- Initialize the workspace
Step 14: Wait for Setup Completion
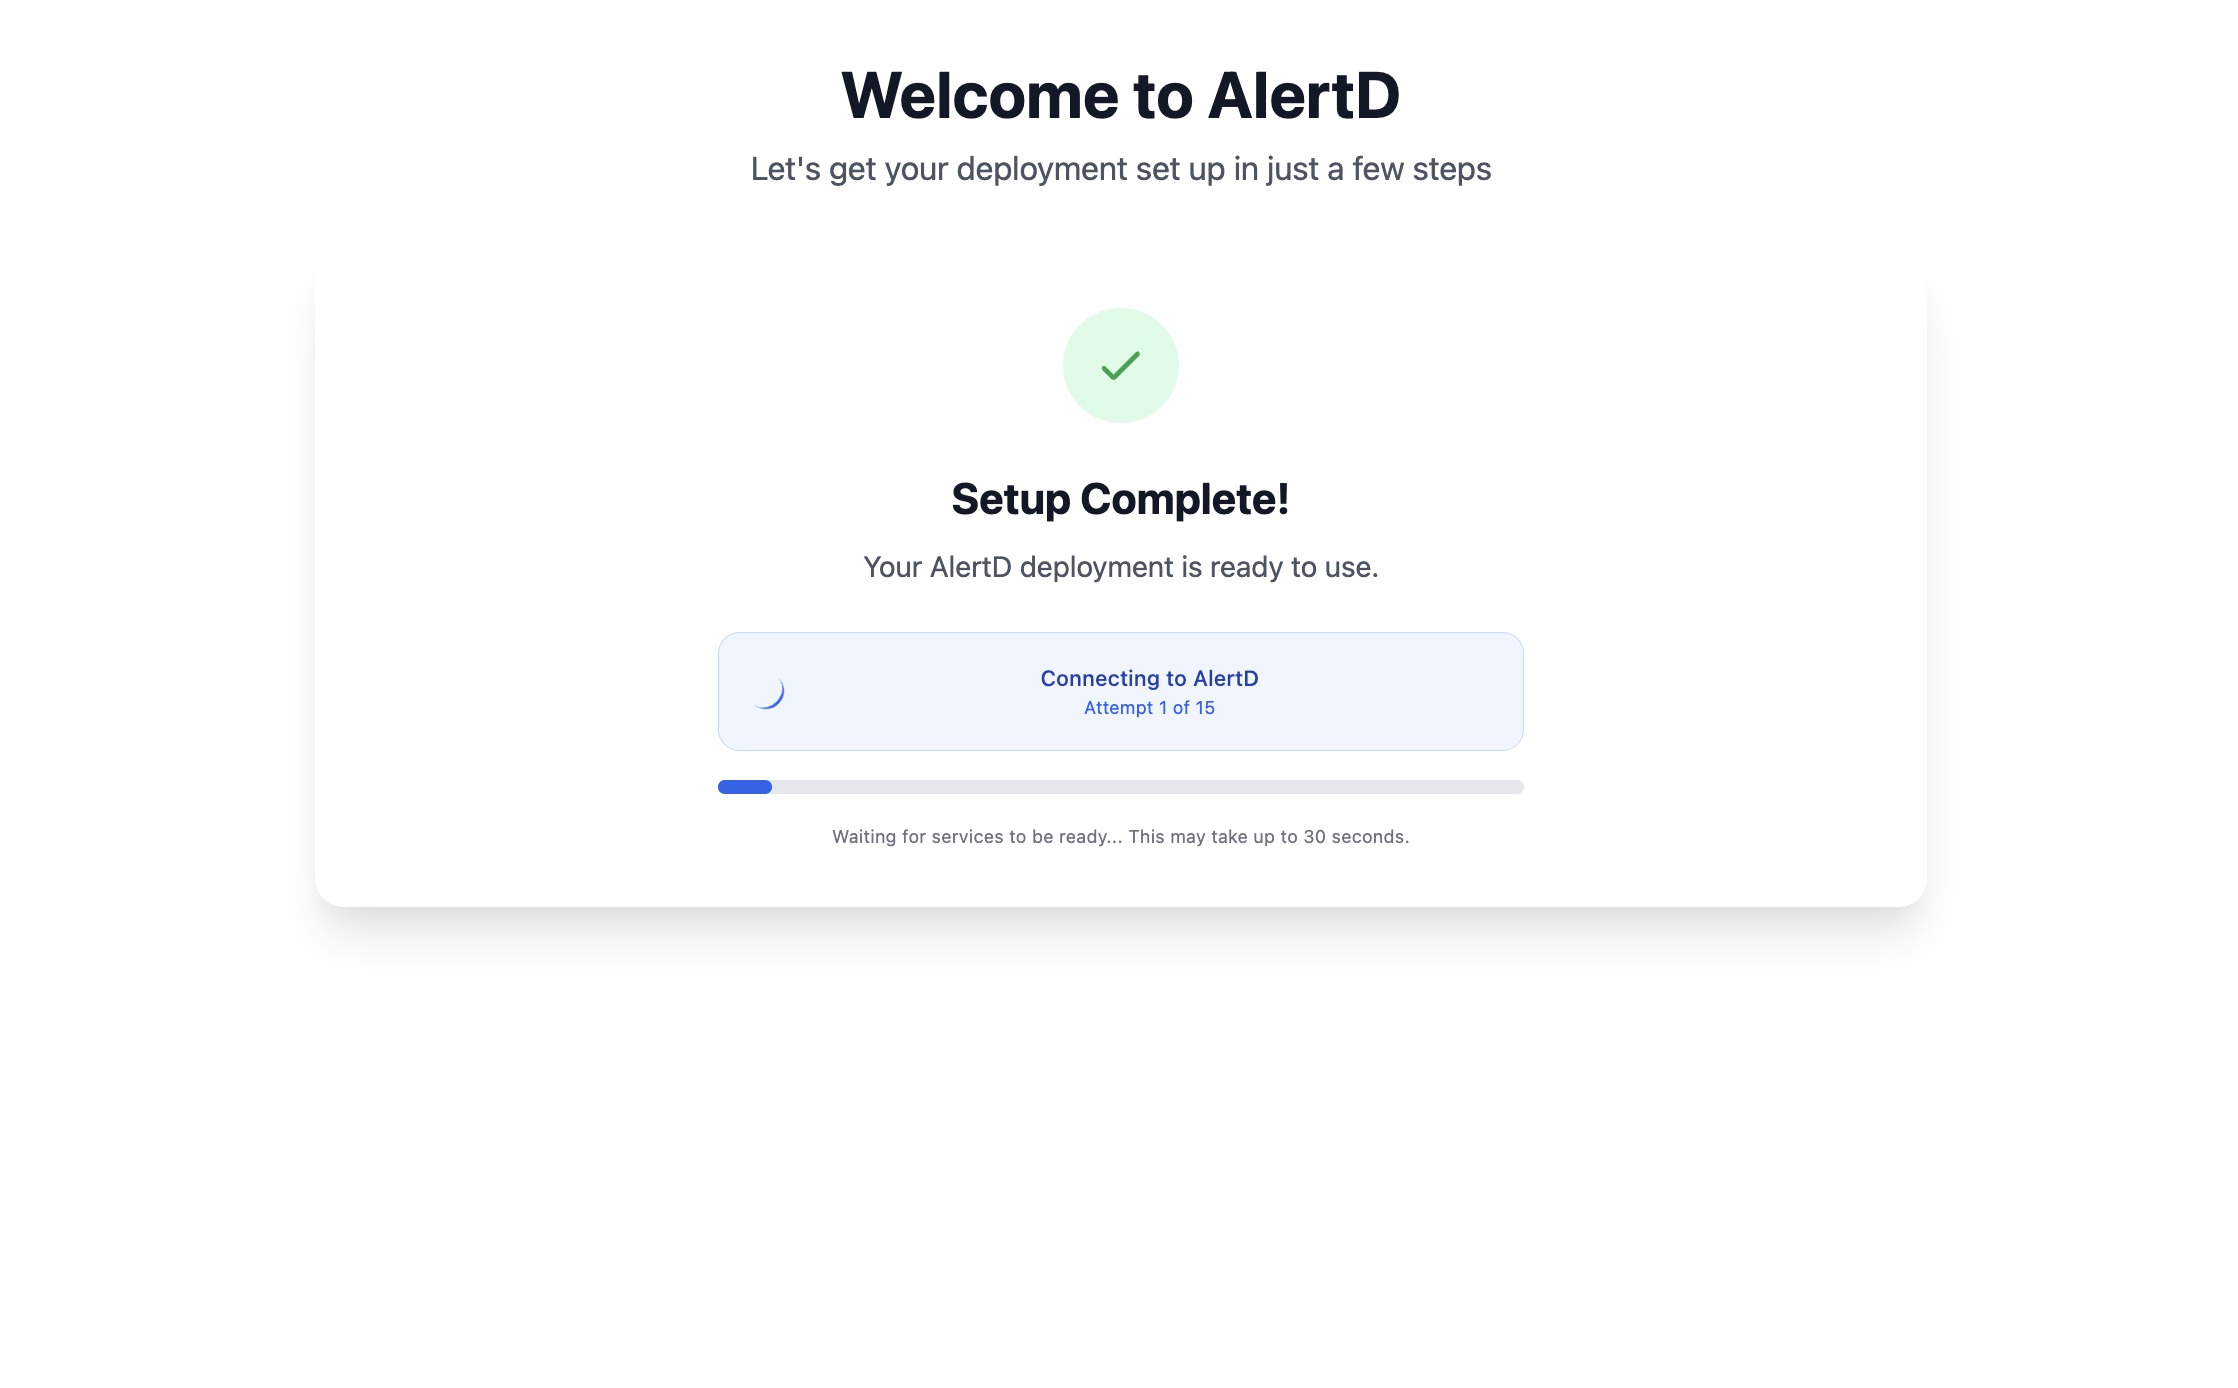
- AlertD validates the connection and finalizes deployment
- You’ll see a Setup Complete! message with:
- Green checkmark icon
- “Your AlertD deployment is ready to use.”
- Progress indicator: “Connecting to AlertD” with attempt counter
- Wait for services to be ready; this step usually takes around three minutes.
Step 15: Access the AlertD Dashboard
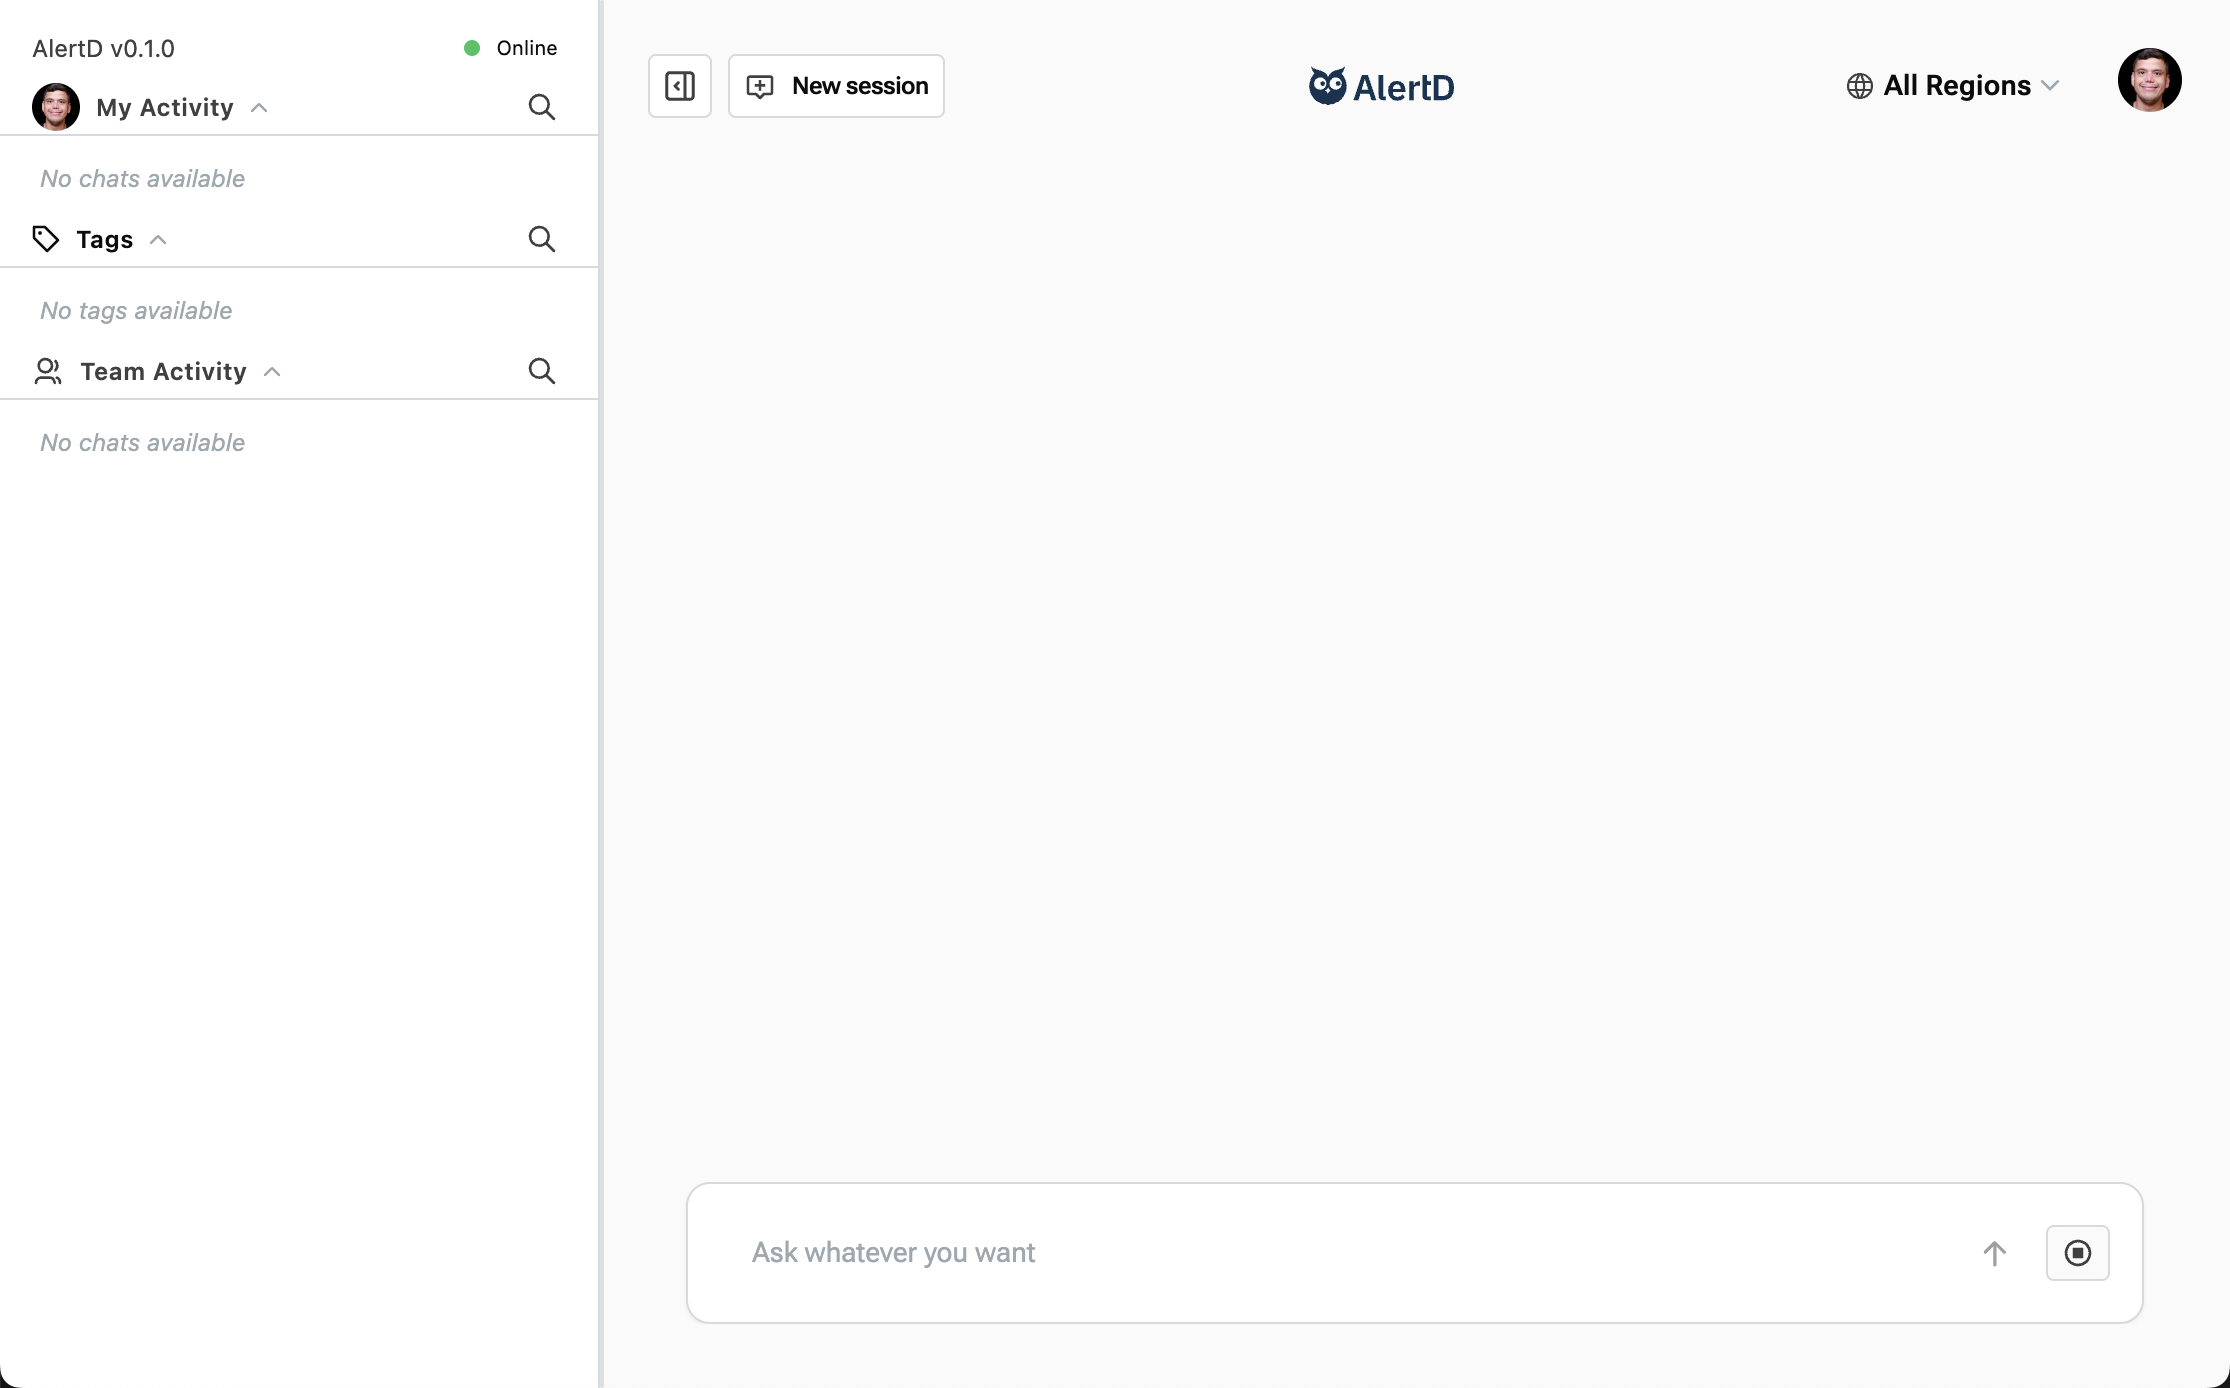
Once setup completes, you’re automatically redirected to the AlertD workspace:
Sidebar sections:
- My Activity – Your personal chat sessions and queries
- Tags – Organizational tags for sessions
- Team Activity – Shared sessions from your workspace teammates
Main workspace:
- New session button – Start asking questions
- Region selector – Choose AWS region (defaults to “All Regions”)
- Search bar – “Ask whatever you want” prompt
You’re now ready to ask your first question!
Setup Complete!
Your AlertD deployment is fully configured and ready to use. You now have:
- Authenticated workspace with team access
- AWS IAM role with read-only permissions to CloudWatch in the target account
- Cross-account AssumeRole access from AlertD to the target account
- Access to the AlertD web interface
Troubleshooting
Authentication Issues
Problem: Cannot authenticate with Google, GitHub or Atlassian
Solutions:
- Ensure popup blockers are disabled
- Try a different browser
- Check that auth.demo.alertd.ai is accessible from your network
- Clear browser cache and cookies
Problem: After logging into Google/Github, you reach the following screen error:
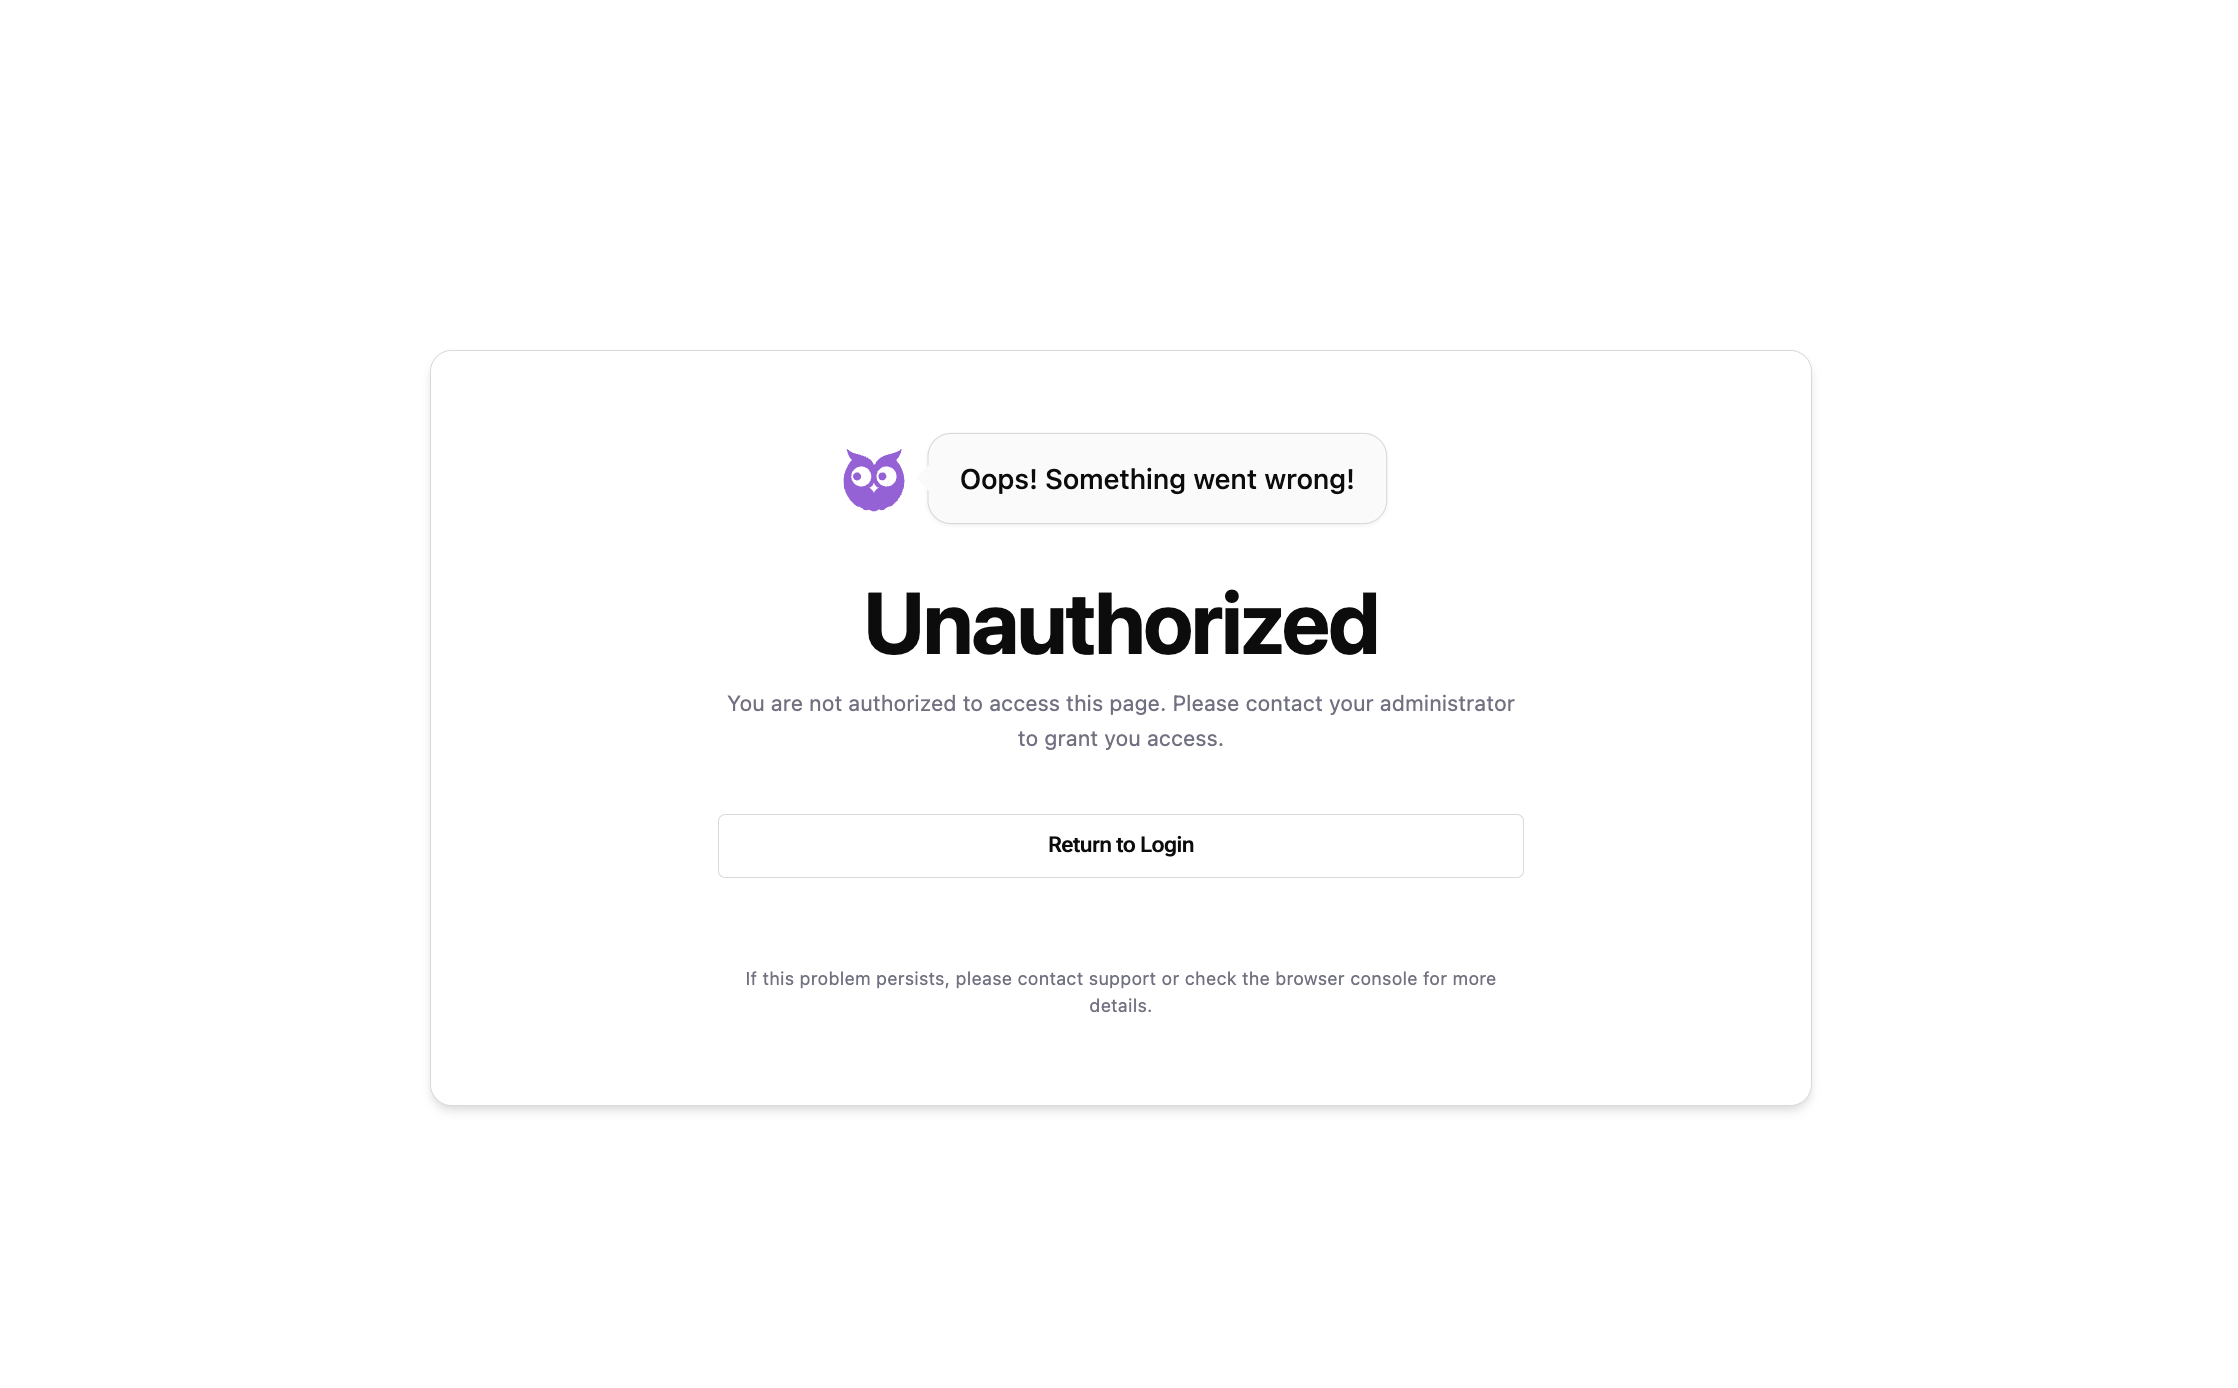
Solutions:
- This is a known bug. Return to the previous screen and reauthenticate. We are actively working to fix this issue.
IAM Role Issues
Problem: AlertD cannot assume the IAM role
Solutions:
- Verify the trust policy includes the correct Principal ARN
- Ensure you copied the full Role ARN (starts with
arn:aws:iam::) - Confirm the role was created in the target AWS account, not the AlertD deployment account
- Wait 30-60 seconds for IAM changes to propagate if you created the role in a different region.
Problem: “Access Denied” errors when querying AWS
Solutions:
- Verify ReadOnlyAccess policy is attached to the role
- Check that the IAM role has no permission boundaries restricting access
- Ensure your AWS account has no SCPs blocking read operations
Connection Issues
Problem: Setup completion hangs or times out
Solutions:
- Verify ECS tasks are running in your CloudFormation stack
- Check that the load balancer target group shows the application as
healthy - Ensure private subnets have NAT Gateway for outbound internet access
- Review CloudWatch logs for the AlertD ECS tasks